Category: Product Reviews & Testing

  • The Gym Timer That Keeps My Rest Periods Honest: Why I Stopped Using My Phone

    The Gym Timer That Keeps My Rest Periods Honest: Why I Stopped Using My Phone

    This post contains affiliate links. As an Amazon Associate, I earn from qualifying purchases at no extra cost to you.

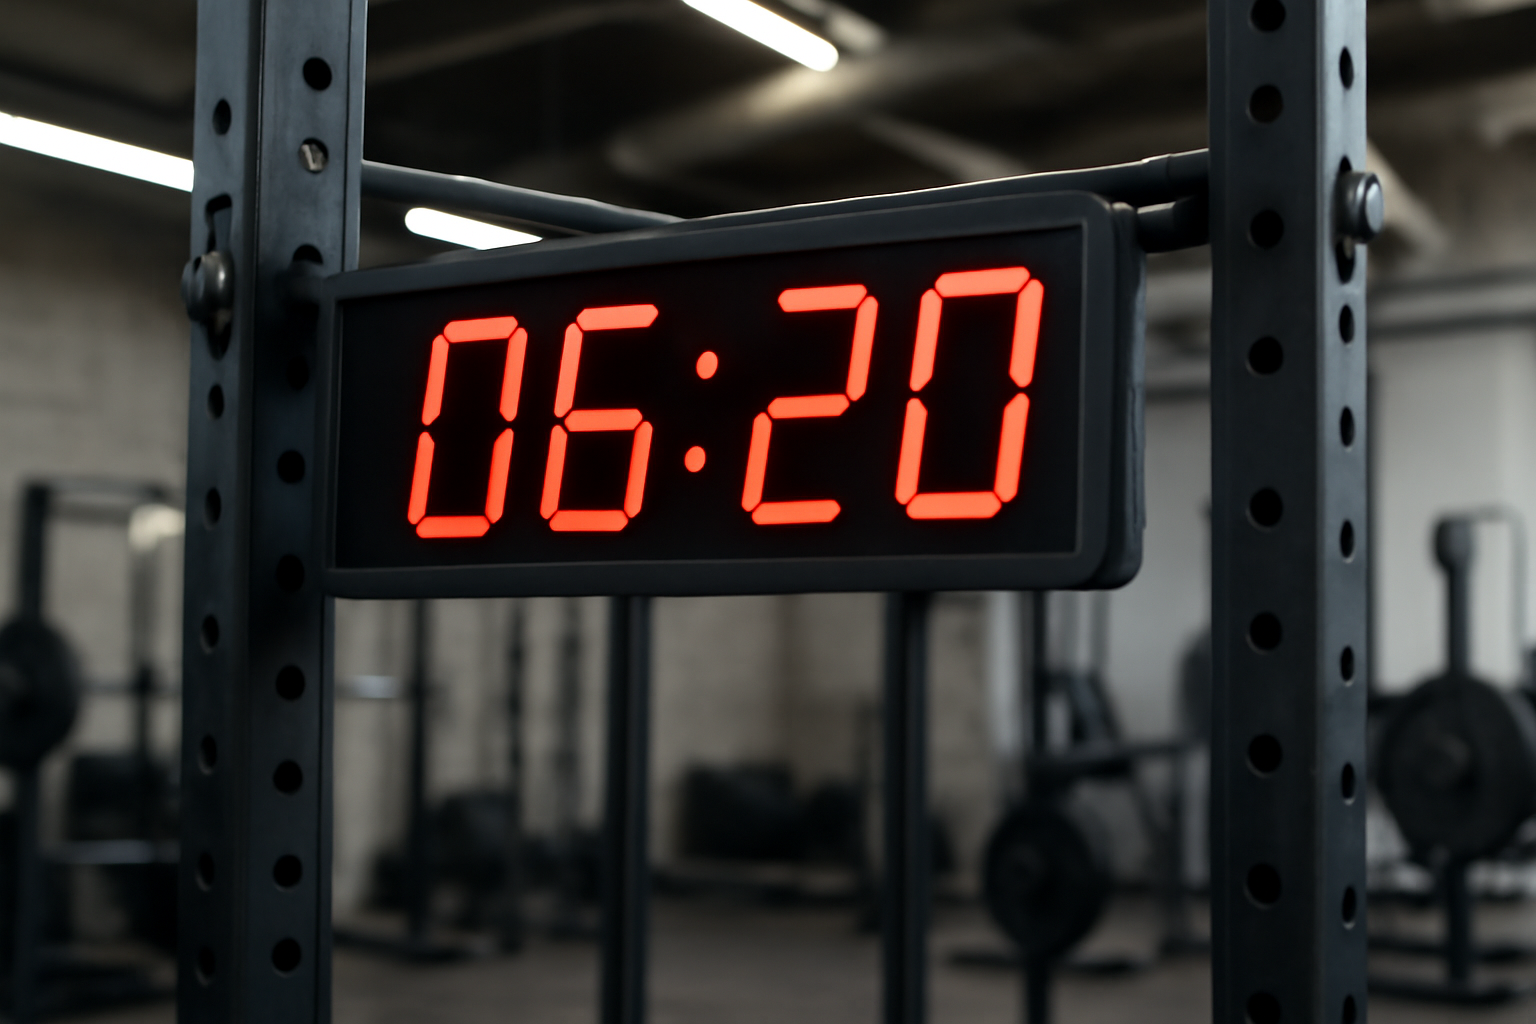
    Last spring, I caught one of my longest-standing clients — a 44-year-old accountant training for his first powerlifting meet — scrolling Instagram between squat sets. He swore he’d only been resting “maybe two minutes.” His phone said nine. That moment crystallized a problem I’d been ignoring for years. Using a phone to manage gym interval timer rest periods is a recipe for dishonest training. Notifications pull your attention. One tap leads to another. Suddenly your 90-second rest becomes a five-minute social media spiral, and your workout loses all its intended stimulus.

    I’d been guilty of this myself. Even as a trainer with over 15 years of coaching experience, I’d lean on my phone during my own sessions. I told myself I had the discipline to keep it quick. I didn’t — not consistently. Rest periods are a training variable just like load and rep range. Letting them drift destroys the data you need to track real progress.

    That’s what sent me hunting for a dedicated solution. I needed something simple, durable, and completely independent from a smartphone. After some digging and a handful of gym floor conversations, I landed on the Gymboss Interval Timer and Stopwatch – Black/Blue SOFTCOAT. Here’s everything I found out after months of daily use.

    Why I Chose the Gymboss Over Every Other Option

    My first instinct was to look at smartwatch solutions. I already owned an Apple Watch, so I tested its timer app for three weeks. It worked, technically. However, the watch face would go dark mid-set, and fumbling to reset it between heavy Romanian deadlifts at 225 lbs felt clunky and annoying. I wanted zero friction.

    Next, I asked around my training community. Two other coaches I respect — one who runs a CrossFit affiliate, another who coaches Olympic weightlifting — both mentioned the Gymboss by name. Independently. That kind of unprompted peer recommendation carries serious weight with me.

    I also considered a couple of generic countdown timers on Amazon. Most had poor reviews around button durability after a few months. In my experience, gym equipment takes a beating. Dropped on rubber flooring, shoved in a bag, clipped to a belt — a flimsy build won’t last. The Gymboss had thousands of reviews, a loyal user base, and a track record in real training environments. The SOFTCOAT finish specifically appealed to me because it meant a secure grip even with sweaty hands.

    Specifically, the Black/Blue SOFTCOAT version looked clean and professional without screaming “toy.” That matters when you’re coaching clients. Your tools send a message about how seriously you take the work.

    First Impressions: Build Quality and That SOFTCOAT Feel

    The package arrived in a small, no-fuss box. No excessive packaging, no lengthy manual. I appreciated that immediately. The device itself is compact — roughly the size of a large matchbox. It’s light without feeling cheap.

    That SOFTCOAT finish is the real standout on first touch. It has a slightly rubberized, matte texture that feels genuinely grippy. Compare it to a hard-plastic device and the difference is obvious. I clipped it to my lifting belt during my first test session, and it stayed firmly in place throughout sets of pause squats at 185 lbs for 4 sets of 3 reps.

    The clip itself is solid metal. I’ve had cheap plastic clips snap off cheaper timers before. This one didn’t budge. The screen is small but readable in normal gym lighting. Under very harsh direct sunlight it gets harder to read, but that’s a minor issue in most training environments.

    Button feel is firm and positive. You know when you’ve pressed it. Setup took me about four minutes to figure out without reading instructions — which is exactly how intuitive a tool like this should be. Two interval settings, vibrate or beep alert, and a clear start/stop button. That’s the whole system. No app. No Bluetooth. No charging cable. Just a standard CR2032 battery that Gymboss says lasts about a year.

    How I Tested the Gymboss Interval Timer for Rest Periods

    I used the Gymboss Interval Timer and Stopwatch – Black/Blue SOFTCOAT across three distinct training contexts over a 14-week period. That gave me a genuine cross-section of use cases rather than a single style of workout.

    Strength Training Block (Weeks 1–6)

    My own training during this block followed a four-day upper/lower split. Main lifts included bench press (working up to 245 lbs for 3×5), barbell rows (185 lbs for 4×6), and front squats (175 lbs for 4×4). Rest periods here were strictly 2:30 between working sets. I clipped the Gymboss to my waistband and set it to beep at the 2:30 mark.

    For accessory work — dumbbell lateral raises, face pulls, tricep pushdowns — I used 60-second rest periods. The dual-interval feature let me set both without reprogramming between exercises. That saved real time and mental energy.

    Client HIIT and Circuit Sessions (Weeks 3–14)

    I coach six clients in one-on-one sessions weekly. Three of them were running metabolic conditioning programs during this period. Work intervals ranged from 20 to 45 seconds. Rest intervals ranged from 15 to 60 seconds depending on the protocol. The Gymboss handled all of it without hesitation.

    One client specifically was working a 40-seconds-on, 20-seconds-off Tabata-style circuit: kettlebell swings at 35 lbs, box step-ups, battle rope slams, and push-ups. We ran six rounds. Having a dedicated timer freed me up to coach movement quality instead of watching a phone screen. That’s a genuine game-changer from a coaching standpoint.

    Boxing and Conditioning Work (Weeks 7–14)

    I also used it for my own conditioning days — specifically three-minute round intervals with one-minute rest, mimicking boxing round structure. The Gymboss handled this without any fuss. Clip it to your shorts, hit start, and let it run. The vibrate mode is strong enough to feel clearly through gym shorts during active movement, which surprised me in a good way.

    What Actually Changed in My Training

    The most immediate change was rest period compliance. Within the first two weeks of the strength block, my 2:30 rest periods became actually 2:30 — not 3:45, not 2:00. As a result, my session density improved. Workouts that had been running 75 minutes dropped to a consistent 58–62 minutes.

    That efficiency translated into better training data. When your rest periods are consistent, your performance numbers become meaningful. If I hit 3×5 at 245 lbs with 2:30 rest last week, and I hit 3×5 at 250 lbs with 2:30 rest this week, that’s a real strength gain. Previously, inconsistent rest periods muddied those comparisons.

    For my HIIT clients, the improvement was even more noticeable. One client dropped her average 500m row time by 4 seconds over six weeks — partly from training adaptation, but also from finally executing the intended work-to-rest ratios correctly. On the other hand, I can’t claim the timer alone drove that result. Consistent programming and effort played the bigger roles. That said, having accurate rest periods was a meaningful piece of the puzzle.

    Another unexpected benefit: clients stopped reaching for their phones between sets. The Gymboss on the bench or rack nearby served as a visual anchor. Everyone could see the countdown. It created accountability without me having to say anything.

    The Gym Timer Downsides You Should Know About

    I want to be straight with you here. The Gymboss Interval Timer and Stopwatch – Black/Blue SOFTCOAT is not perfect. There are real limitations worth knowing before you buy.

    The screen is small. If your vision isn’t sharp or you’re training in dim lighting, reading the display gets annoying. I never found this to be a dealbreaker since I rely mostly on the beep or vibration alert. However, if you want to glance across the room from a distance, this isn’t a large-display timer.

    The button interface has a learning curve. Programming two different interval lengths requires cycling through a menu system that isn’t immediately obvious. I fumbled through it a couple of times before it clicked. The manual helps, but it’s not elegant software design.

    For complex programming — like wave-loading protocols with four different rest durations — this device hits a ceiling quickly. It handles two intervals cleanly. Beyond that, you’re reprogramming between exercises, which slows things down. Experienced coaches running advanced periodized programs may find that limiting.

    Finally, the beep is genuinely loud in a quiet gym. I’ve had people nearby turn and look when it goes off. The vibrate mode solves this completely, but it’s worth noting if you train in a quieter facility.

    Who Should Skip This Timer

    Casual gym-goers who train three days a week with no real program structure probably don’t need this. If you’re not tracking your rest periods intentionally, a dedicated timer won’t transform your results. For example, if you’re doing three sets of whatever feels right with no particular goal in mind, this tool won’t add much value.

    Tech-forward athletes who already use a quality GPS watch with a reliable interval timer may also find this redundant. Specifically, if your current setup is working and you’re not reaching for your phone unnecessarily, the problem this solves may not be your problem.

    Final Verdict: Best Gym Interval Timer for Rest Periods

    After 14 weeks of daily use across multiple training contexts, my verdict is clear. The Gymboss Interval Timer and Stopwatch – Black/Blue SOFTCOAT is the best low-cost, no-frills solution for managing gym interval timer rest periods with zero distraction. It does one thing exceptionally well: it keeps you honest.

    Buy this if you are a serious lifter, a coach, or anyone who programs their training with specific rest periods in mind. It suits powerlifters running percentage-based programs, CrossFit athletes managing work-to-rest ratios, and personal trainers coaching circuit or HIIT sessions. The SOFTCOAT build is durable enough for daily gym use. The clip holds securely. The dual-interval feature covers the vast majority of real-world training needs.

    Skip it if you want a big, visible display or need more than two programmable intervals. Also skip it if you have zero phone discipline issues — though in my experience, most people overestimate that.

    At its price point, there is nothing comparable. I’ve recommended it to four coaches in my network since starting this review. All four are still using it. That says everything.

    A Quick Note on the Alternative: Gymboss Violet/Pink Metallic Gloss

    If the black and blue colorway isn’t your style, the Gymboss Interval Timer and Stopwatch – Violet/Pink Metallic Gloss is functionally identical. Same interval settings, same alert options, same clip design. The main difference is the glossy metallic finish instead of the SOFTCOAT texture. In my opinion, the SOFTCOAT provides a better grip during sweaty training sessions. However, if you prefer the look of the violet/pink version — or want to easily identify your timer in a shared gym space — it’s a perfectly solid choice. The core performance is the same.

  • I Bought an Adjustable Dumbbell Set for My Home Gym and Sold My Rack

    I Bought an Adjustable Dumbbell Set for My Home Gym and Sold My Rack

    This post contains affiliate links. As an Amazon Associate, I earn from qualifying purchases at no extra cost to you.

    Last spring, I hit a wall. My garage gym had become a hazard zone. A full rack of fixed dumbbells lined one wall — 10s, 15s, 20s, 25s, 30s, 35s, 45s — and navigating around them was a workout in itself. I’m a personal trainer and strength coach with over 15 years of experience, and I couldn’t justify the footprint anymore. My clients were asking me for honest adjustable dumbbell set home gym review recommendations. So I decided to test one myself, get rid of the rack, and report back with real numbers.

    I wasn’t just curious. I was frustrated. Fixed dumbbells take up serious real estate. They’re also expensive to collect over time. When I started getting requests from clients building home gyms on tight budgets, I knew I needed a go-to recommendation — something I’d actually used and trusted.

    That search led me to the FDS1 Adjustable Dumbbell Set, 45lbs Free Weights Set with Upgraded Nut, 5 in 1 Weight Set Used as Kettlebells, Barbell, Push Up Stand, Fitness Exercise for Home Gym Suitable Men/Women. Here’s everything I found after eight weeks of real training with it.

    Why I Chose This Adjustable Dumbbell Set Over the Others

    I researched for about three weeks before buying. I checked Reddit fitness threads, asked two other trainers I respect, and read through dozens of Amazon reviews looking for patterns — not just star ratings. Many adjustable dumbbell sets get called out for wobbly collars, cheap locking mechanisms, or plates that shift mid-rep. That’s a dealbreaker for me professionally.

    The FDS1 kept coming up in discussions about budget-friendly versatility. Specifically, the “upgraded nut” locking system caught my attention. Previous versions of similar products used basic spin-lock collars that loosened under dynamic movements. The upgraded version addressed that directly. That’s the kind of incremental improvement that matters in practice.

    On top of that, the 5-in-1 functionality stood out. Most adjustable sets are just dumbbells — nothing more. However, this one converts into a kettlebell, a barbell, and even a push-up stand. For clients in small apartments, that’s a significant value proposition. I wanted to test whether those conversion modes actually worked under load or were just marketing copy.

    What Pushed Me Over the Edge

    Two things sealed it. First, a trainer colleague who specializes in postpartum fitness had been using a similar FDS1 configuration for six months with no complaints. Second, the price point fit what I recommend to beginners — under $100 for a full adjustable set with multiple conversion options is genuinely hard to beat. I ordered it the same day.

    First Impressions: Unboxing and Build Quality

    The package arrived in two days. Out of the box, my first thought was: these feel more solid than I expected. The plates are cast iron with a knurled chrome handle — not rubberized, but smooth enough to grip comfortably. Weight markings are stamped clearly, not just stickered on.

    The upgraded nut collar system requires a simple hand-tightening motion. It locks down firmly. I loaded the dumbbells to 35 lbs each and shook them aggressively before my first session. Nothing rattled. Nothing slipped. That passed my first test.

    Setting up each weight adjustment takes about 20 to 30 seconds per dumbbell. That’s slower than selector-style adjustable dumbbells like Bowflex or PowerBlocks. However, selector-style sets cost two to four times more. For the price, the adjustment speed is a fair trade-off. The kettlebell conversion uses an included handle attachment that locks over the plates. It felt slightly awkward at first but became intuitive after two or three uses.

    The barbell configuration uses a connector rod to join both dumbbell handles. I tested it at 45 lbs total load. It held firm. That said, I wouldn’t recommend using the barbell mode for heavy pressing movements above 45 lbs — the connector rod introduces some flex under serious load.

    How I Tested the FDS1 Adjustable Dumbbell Set

    I ran an eight-week structured program using this set as my primary training tool. My goal was simple: replicate what I’d normally do with a fixed dumbbell rack and see if anything suffered.

    Here’s the testing structure I used:

    • Weeks 1–2: Full-body hypertrophy work, 3 days per week, 3–4 sets of 10–15 reps per movement
    • Weeks 3–4: Upper/lower split, 4 days per week, introducing heavier loads (30–45 lbs) on presses and rows
    • Weeks 5–6: Push/pull/legs, 5 days per week, higher volume with shorter rest periods
    • Weeks 7–8: Mixed conditioning — kettlebell swings, farmer carries, push-up stand workouts, and barbell accessory lifts

    Specific exercises I tracked included dumbbell bench press, Romanian deadlifts, goblet squats, bent-over rows, lateral raises, bicep curls, overhead triceps extensions, and kettlebell swings. I also logged adjustment time per session to measure real-world efficiency.

    Tracking What Actually Mattered

    Beyond just using the product, I tracked three things: collar security (did plates ever shift?), adjustment efficiency (how much time was lost switching weights?), and exercise versatility (could I run my full program without compromising form or safety?). Those three factors determine whether a product is actually useful — not just functional in theory.

    What Actually Changed in My Training

    Eight weeks later, here’s the honest breakdown.

    The collar held. In over 40 sessions — including dynamic movements like dumbbell snatches and kettlebell swings — the upgraded nut never once came loose mid-set. That alone is worth highlighting. I’ve tested cheaper sets that loosened within two weeks. This one didn’t.

    The kettlebell conversion genuinely changed my conditioning work. Kettlebell swings at 35 lbs for 4 sets of 20 reps became a staple in my Friday sessions. The handle attachment was secure enough to swing without hesitation. In my experience, most converted-handle kettlebell attachments feel cheap — this one didn’t.

    The push-up stand feature surprised me. I was skeptical. However, using the handles as push-up grips reduced wrist strain significantly during high-volume sets. I went from 3 sets of 20 standard push-ups to 4 sets of 25 with better form. That’s a real, measurable improvement — and I credit the neutral wrist position the handles create.

    Gym Space: The Biggest Win

    My garage gym reclaimed about 12 square feet when I sold the fixed rack. That doesn’t sound like much, but in a one-car garage gym, it’s significant. I added a foam roller station and a resistance band rack in that recovered space. The entire FDS1 Adjustable Dumbbell Set, 45lbs Free Weights Set with Upgraded Nut, 5 in 1 Weight Set fits in a single storage corner with the included stand — no wasted floor space at all.

    The Downsides You Should Know Before Buying

    I’m going to be straight with you here. No product is perfect, and this one isn’t either.

    Adjustment time is a real issue for supersets. Switching from 25 lbs for lateral raises to 40 lbs for rows takes 45 to 60 seconds total. During a timed superset protocol, that gap breaks the flow. If you follow fast-paced programming like AMRAP circuits or timed supersets, this will irritate you. It irritated me during weeks 5 and 6 specifically.

    The barbell mode has limits. I tested it up to 45 lbs total. Above that, the connector rod introduces flex that feels unsafe for pressing or squatting. For supplemental work — like barbell curls or light Romanian deadlifts — it works fine. However, don’t try to replicate barbell bench press at meaningful loads. It’s a convenience feature, not a replacement for a real barbell.

    The max load is 45 lbs per dumbbell. For intermediate and advanced lifters, that ceiling becomes limiting relatively quickly. My own dumbbell incline press sits at 55 lbs per hand on strong days. As a result, I had to modify some heavier movements during this test period. That was a genuine limitation for me personally.

    The chrome handle is slippery when wet. During high-rep sets, I noticed grip slipping slightly without chalk or workout gloves. A rubberized or knurled handle would improve this. For sweaty training environments, keep a chalk bag nearby or use lifting gloves.

    Moment of Doubt

    Around week four, I genuinely questioned the switch. I missed the instant weight selection of my old fixed rack. Sitting at 35 lbs mid-set, needing 40 lbs for the next exercise, I felt the adjustment delay more than I expected. It took a couple more weeks to adapt my programming around it — batching similar-weight exercises together to minimize switches. That small adjustment solved most of the friction.

    Final Verdict: Who Should Buy This Adjustable Dumbbell Set Home Gym Review Winner

    After eight weeks of real, structured training, my verdict is clear. The FDS1 Adjustable Dumbbell Set, 45lbs Free Weights Set with Upgraded Nut, 5 in 1 Weight Set Used as Kettlebells, Barbell, Push Up Stand, Fitness Exercise for Home Gym Suitable Men/Women is one of the most versatile budget home gym tools I’ve tested in years. It delivers legitimate value — especially for lifters who train at moderate loads and want to maximize small spaces.

    Buy This If You Are:

    • A beginner or intermediate lifter training at 10–45 lbs per dumbbell
    • Building a home gym on a tight budget
    • Working in a small apartment, garage, or spare room
    • Someone who wants kettlebell and push-up stand functionality without buying separate equipment
    • A personal training client following a structured hypertrophy or conditioning program

    Skip This If You Are:

    • An advanced lifter who regularly presses or rows above 50 lbs per hand
    • Running fast-paced AMRAP or superset programs where instant weight switching matters
    • Expecting the barbell mode to replace a real barbell for heavy compound lifts
    • Someone with grip issues who needs textured handles without chalk

    For the price point and the space savings alone, I’d recommend this to the majority of home gym athletes. I sold my fixed rack and haven’t looked back. That’s the most honest endorsement I can give.

    The Runner-Up: A Strong Alternative for Heavier Lifters

    If the 45 lb ceiling feels limiting from the start, consider the TYZDMY Adjustable Dumbbells Set of 2, 52.5 lbs per dumbbell (105 lbs pair), 15-in-1, for Men/Women Gym Equipment for Home Strength Training. It offers significantly more load capacity — up to 52.5 lbs per dumbbell — and a wider weight increment range across 15

  • I Tried a Weighted Vest for My Walks and Bodyweight Workouts: 6-Week Results

    I Tried a Weighted Vest for My Walks and Bodyweight Workouts: 6-Week Results

    This post contains affiliate links. As an Amazon Associate, I earn from qualifying purchases at no extra cost to you.

    Last spring, I hit a wall. My morning walks had become genuinely boring, and my bodyweight routine had plateaued hard. I’ve been a personal trainer and strength coach for over 15 years, so I know exactly what plateau feels like — and I also know exactly how to fix it. Progressive overload is the answer. Always. But adding a weighted vest to my daily walks felt like something I’d been recommending to clients forever without truly stress-testing myself. So I decided to run a proper weighted vest workout walking review experiment on my own body over six full weeks.

    The timing made sense. Several of my clients were asking about low-impact ways to increase calorie burn without adding more gym sessions. I needed firsthand data, not just textbook knowledge. That’s when I started researching adjustable vests seriously.

    Why I Chose the ExtreSpo Adjustable Weighted Vest

    I looked at dozens of options before settling on one. My criteria were specific: adjustable weight, a secure fit for both walking and dynamic movements, decent build quality, and a price point that made sense for everyday use. Fixed-weight vests annoyed me immediately. Progression matters. If I can’t increase the load over time, the tool has a short shelf life.

    A few coaches in my professional network had mentioned the ExtreSpo Adjustable Weighted Vest for Women and Men, 11-20lb Weight Vest with 6 Ironsand Weights specifically. The adjustable range of 11 to 20 pounds was a key selling point. That range covers a solid progression window — light enough to start without wrecking your joints, heavy enough to create a real challenge over time.

    The reflective strip was a practical bonus. I walk early mornings, often before sunrise. Visibility matters. On the other hand, many competing vests in this price range skip that feature entirely. The ironsand weight packets also intrigued me — they distribute mass differently than steel plates and tend to sit closer to the body’s center of gravity. That detail matters for comfort during longer walks.

    First Impressions: Unboxing and Build Quality

    The vest arrived well-packaged. My first reaction was positive — it felt denser and more structured than I expected at this price. The material has a neoprene-like texture that’s both durable and slightly breathable. It’s not going to win awards for airflow, but it’s manageable.

    Sizing was straightforward. The straps adjusted easily, and I had a snug, stable fit within about two minutes. I wear a large in most athletic gear, and the vest accommodated that without any awkward bunching. The six ironsand weight packets slot into internal pockets cleanly. Each packet is labeled, which makes loading and adjusting simple.

    My one initial concern was the zipper closure. It felt slightly stiff on the first use. However, after a few sessions, it loosened up and stopped being an issue. The stitching looked reinforced at all the stress points, which is exactly what you want when the vest is loaded to 20 pounds and you’re dropping into push-up position.

    Fit During Movement

    The first walk I took lasted 35 minutes at a moderate pace. Bounce and shift were minimal. That surprised me — cheaper vests tend to ride up during extended walking. This one stayed planted. The dual side-buckle system deserves credit for that. Specifically, the lateral compression straps kept everything locked without feeling restrictive through the torso.

    How I Tested the ExtreSpo Weighted Vest Over 6 Weeks

    I ran a structured protocol. Nothing random, nothing casual. Here’s exactly how six weeks broke down:

    • Weeks 1–2: 11 lbs loaded. Daily 40-minute morning walks, 5 days per week. Bodyweight circuit 3x per week (push-ups, lunges, step-ups, bear crawls).
    • Weeks 3–4: Bumped to 15 lbs. Walks extended to 50 minutes. Added weighted pull-ups and dips to the circuit.
    • Weeks 5–6: Full 20 lbs. Walks at 55–60 minutes. Circuit included plank holds (60 seconds), push-up variations, step-ups with knee drive, and bodyweight squats (3 sets of 20 reps).

    I tracked heart rate, average pace, perceived exertion, and weekly bodyweight. I also logged any discomfort, chafing, or equipment issues after every session. Total sessions completed: 42 workouts over 42 days. No missed sessions, which is itself a data point about wearability.

    The Bodyweight Circuit Details

    My circuit was three rounds, minimal rest. Push-ups were 3 sets of 15 at 11 lbs, progressing to 3 sets of 12 at 20 lbs. The added load noticeably shifted the challenge from muscular endurance toward raw strength. Lunges went from 3 sets of 16 reps per leg at 11 lbs to 3 sets of 12 per leg at 20 lbs — with a measurable burn difference I could feel in my quads and glutes by rep 8.

    Bear crawls were the most interesting test. At 20 lbs, a 20-meter bear crawl became genuinely taxing. My heart rate spiked to 158 bpm mid-crawl, compared to around 132 bpm without the vest. That’s a meaningful cardiovascular difference from the same movement at the same pace.

    What Actually Changed After 6 Weeks

    Let me give you the honest numbers. My average walking pace held steady at 3.4 mph while wearing 20 lbs. That surprised me — I expected more slowdown at full load. Average heart rate during walks increased from 108 bpm in week one to 127 bpm in week six, even at similar paces. That’s a real uptick in cardiovascular demand with zero additional time investment.

    Body composition changes were subtle but present. I lost approximately 4 lbs over the six weeks while eating at maintenance. My push-up max (without the vest, tested weekly) improved from 34 reps to 41 reps. That’s a 20% improvement in 42 days — driven largely by the accumulated volume of weighted push-up work.

    My lower-body endurance also improved noticeably. Step-up sets that felt moderately hard in week one felt comfortable by week five. As a result, I added a fourth set during the final two weeks to maintain the challenge. That’s the power of progressive overload in action — exactly what I predicted, but still satisfying to see confirmed.

    The Moment I Doubted the Vest

    Full honesty: around day 19, I had a rough session. I’d loaded the full 20 lbs too aggressively after a poor sleep night. My lower back felt fatigued — not injured, but overworked — halfway through my walk. I backed off to 15 lbs for two days and reassessed.

    The lesson wasn’t that the vest was bad. The lesson was that progressive overload still requires recovery. Jumping weight increments too fast with a loaded vest is the same mistake people make on the barbell. That said, the vest itself performed fine — the issue was my programming decision, not the equipment.

    The Downsides You Should Know About

    No piece of gear is perfect. Here’s what I didn’t love about the ExtreSpo Adjustable Weighted Vest for Women and Men, 11-20lb Weight Vest with 6 Ironsand Weights, Body Weight Vest Exercise Set with Reflective Strip after six weeks of daily use:

    • Heat retention: The neoprene material traps body heat. During warmer sessions, I was noticeably hotter than without the vest. It’s manageable in cool weather, but it becomes uncomfortable above 75°F.
    • Upper weight ceiling: 20 lbs is the max. For experienced lifters or heavier athletes, that ceiling will be reached quickly. If you’re already training seriously and want a vest that goes to 30+ lbs, this won’t serve you long-term.
    • Not ideal for running: I attempted two short jogs at 11 lbs. The vest shifted slightly at running pace in a way it never did during walks or circuits. It’s designed for walking and training — not running.
    • Weight packet adjustment: Adding or removing individual packets mid-session is slightly fiddly. It’s a minor inconvenience, but worth knowing if you plan to hot-swap weights between exercises.

    None of these are dealbreakers for the target use case. However, they’re real limitations worth understanding before you buy.

    Weighted Vest Workout Walking Review: Final Verdict

    After six weeks and 42 sessions, my verdict is clear. The ExtreSpo Adjustable Weighted Vest for Women and Men, 11-20lb Weight Vest with 6 Ironsand Weights, Body Weight Vest Exercise Set with Reflective Strip for Strength Training and Workout is genuinely good gear for a specific audience. It delivers on its core promise — adjustable load, stable fit, and practical design for walking and bodyweight training.

    Buy This If You Are:

    • Someone who walks regularly and wants to increase intensity without running
    • A beginner to intermediate trainee using bodyweight circuits who needs progressive overload
    • A trainer looking for an affordable vest to recommend to clients in the 11–20 lb range
    • An early-morning exerciser who values the reflective safety strip
    • Anyone who wants adjustability without committing to a fixed weight

    Skip This If You Are:

    • An advanced athlete who needs 25–40+ lbs of resistance
    • A runner looking for a vest that stays locked during higher-impact movement
    • Training in consistently warm or humid conditions where heat buildup will be a serious issue

    In my experience, this vest hits a sweet spot that few products at this price range manage: genuinely adjustable, well-built, and practical for real-world daily use. The cardiovascular data from my six-week test confirms it works. The push-up improvement confirms it builds strength. That’s a solid return on investment for a walking and bodyweight training tool.

    Runner-Up Alternative: ZELUS Weighted Vest

    If the ExtreSpo’s 20 lb ceiling feels limiting, the ZELUS Weighted Vest is worth a look. It comes in fixed weights up to 30 lbs and features a similar reflective stripe design. The tradeoff is that fixed-weight vests don’t allow gradual progression — you’re committing to a single load. For beginners or intermediate users, that’s a disadvantage. For advanced trainees who already know their target weight, however, the ZELUS offers a heavier ceiling and a clean, simple design. It’s a solid vest in its own right, just serving a slightly different need.

    For most people reading this, though, the adjustability of the ExtreSpo makes more long-term sense. Start light, progress smart, and let the data tell you when to add more weight. That’s how good training always works.

  • The Ab Roller That Humbled Me: My 8-Week Core Training Experiment

    The Ab Roller That Humbled Me: My 8-Week Core Training Experiment

    This post contains affiliate links. As an Amazon Associate, I earn from qualifying purchases at no extra cost to you.

    After 15 years of coaching athletes, I thought I had core training figured out. Planks, dead bugs, cable crunches, hanging leg raises — I had my toolkit and I trusted it. Then a competitive CrossFit athlete walked into my gym complaining that her midline stability was falling apart under heavy loads. Her squat numbers were solid. Her deadlift was strong. But the moment she hit anything overhead, she folded like a lawn chair. That conversation sent me down a rabbit hole of ab roller wheel review core training research I wasn’t expecting. I started reconsidering every tool I’d dismissed as a “beginner gimmick.”

    The ab roller kept surfacing in serious strength communities. Not the cheap plastic toy version — but as a legitimate anti-extension training tool that few coaches were programming correctly. That distinction matters. So I decided to run a proper eight-week experiment on myself before recommending anything to clients. What I found genuinely surprised me.

    Why I Chose the Abiarst Ab Roller Wheel

    My first instinct was to grab whatever had the most reviews on Amazon. That instinct was wrong. Review count doesn’t tell you much about durability under real training volume. Instead, I spent about a week lurking in three different fitness Facebook groups and two subreddits, specifically asking coaches and experienced lifters what they were actually using. The Abiarst Ab Roller Wheel came up repeatedly — not as the flashiest option, but as the one people kept coming back to after trying others.

    Specifically, two trainers I respect mentioned that the wheel width and axle stability made a real difference for clients who struggled with lateral wobble during rollouts. That was the detail that sold me. Wobble during rollouts means compensating through the hips and lower back — exactly what I was trying to fix. I also compared it against the Vinsguir and a few other mid-range options before placing my order.

    What Pushed Me Toward This One Specifically

    Price mattered, but it wasn’t the deciding factor. What tipped me toward the Abiarst Ab Roller Wheel was the included knee pad. That sounds trivial. However, when you’re training on garage gym rubber flooring or hardwood, knee pad quality directly affects how long you’ll actually stick with the exercise. I’ve seen clients abandon good tools because the included accessories were garbage. The knee pad on this unit looked substantial enough to take seriously.

    I also liked that this wheel was designed for both men and women with clear weight capacity ratings. My client roster includes everyone from 130-pound female athletes to 240-pound powerlifters. A tool that can’t handle that range is useless to me professionally.

    First Impressions Out of the Box

    The package arrived in two days. Assembly took under three minutes — the handles thread into the axle cleanly, no tools required. My first physical impression was that the wheel felt dense. Not heavy in a clunky way, but solid. There was zero flex when I gripped the handles and applied lateral pressure. That matters enormously for rollout stability.

    The grip texture on the handles was aggressive enough to feel secure without being uncomfortable during longer sets. I’ve used rollers where the handles were either too smooth (they slip when your palms sweat) or too rough (they shred your skin by week two). This one landed in the right zone.

    The knee pad was thicker than I expected — roughly 10mm of foam with a non-slip backing. On my gym’s rubber floor, it stayed put. That’s a real win. Nothing breaks your concentration mid-set like a knee pad sliding out from under you.

    The Wheel Width and Roll Feel

    The wheel diameter is designed to provide enough contact surface for stable rollouts. During my first test roll, there was minimal lateral drift — the kind I associate with cheaper single-track rollers. The resistance at full extension felt honest. In other words, it didn’t fight you awkwardly or snap back with weird recoil. That smooth roll-out and controlled return is what separates a usable training tool from a liability.

    My 8-Week Ab Roller Wheel Review Core Training Protocol

    I tested this wheel four days per week, integrated into my existing upper/lower training split. Core work came at the end of each session — never pre-fatigued before primary lifts. Here’s how I structured the eight weeks:

    • Weeks 1–2: Kneeling rollouts from a 12-inch range of motion. 3 sets of 8 reps. Focus on bracing, not distance.
    • Weeks 3–4: Kneeling rollouts, full range. 3 sets of 10–12 reps. Added a 2-second pause at full extension.
    • Weeks 5–6: Mixed sessions — kneeling full rollouts, 3 sets of 12, plus pike rollouts, 3 sets of 8.
    • Weeks 7–8: Standing rollouts attempted from an elevated surface. 3 sets of 5 reps. Also added lateral rollout variations, 2 sets of 6 per side.

    I measured two things throughout: how long I could hold a strict plank (a reliable proxy for anti-extension strength) and how my brace felt during my working sets of deadlifts, which were running at 315–365 lbs during this period.

    Why I Tracked Plank Time and Deadlift Bracing

    Subjective “I feel stronger” feedback is nearly useless for evaluation. Plank duration gave me an objective baseline. My starting max was 2 minutes 10 seconds under strict standards — hips level, no sagging. Deadlift bracing quality I assessed by feel and by whether I needed to reset my breath mid-set at submaximal weights. Both gave me something concrete to track.

    What Actually Changed After 8 Weeks

    By week four, I noticed the first meaningful shift. My plank time jumped from 2:10 to 2:45 without specifically training planks more frequently. That told me the rollout work was transferring directly to anti-extension endurance. That’s exactly the adaptation I was after.

    By week eight, my plank hit 3:30. That’s roughly a 60% improvement in eight weeks — significant enough that I’m confident in attributing it to the rollout programming rather than random variation. My deadlift bracing also felt noticeably more automatic. At 345 lbs for sets of 5, I no longer needed to consciously think about my brace mid-set. It just held.

    The lateral rollout work in weeks seven and eight produced an unexpected bonus. My oblique engagement during loaded carries improved. Farmer’s carry with 70 lbs per hand felt more controlled through the torso. That wasn’t something I was specifically targeting, but I’ll take it.

    How the Wheel Held Up Under Volume

    The Abiarst Ab Roller Wheel, Abs Workout Equipment for Abdominal & Core Strength Training, went through roughly 96 training sessions over the eight weeks — counting my own use plus three clients I incorporated it with. Zero wobble developed. Zero handle loosening. The wheel surface showed minor scuffing on the rubber, which is cosmetic. Structurally, it performed identically in week eight as it did in week one.

    For a piece of equipment under $30, that durability impressed me. In my experience, most budget fitness tools start showing weakness around the six-week mark under real training volume.

    The Downsides You Should Know Before Buying

    Here’s where I keep it honest. The ab roller — including this one — is not a beginner-friendly tool if you go in without a plan. During week one, I had one client attempt kneeling rollouts without establishing a proper brace first. She immediately felt it in her lower back, not her abs. That’s a technique problem, not a product problem. However, it’s a real risk if you’re selling this as a simple “do it and get abs” tool.

    The knee pad, while better than most, isn’t perfect for very hard surfaces like concrete garage floors. On hardwood and rubber, it’s fine. On bare concrete, I’d recommend doubling up with a separate mat underneath.

    Standing rollouts are genuinely difficult. I spent two weeks on them and only achieved clean reps from a slightly elevated surface. If you’re buying this expecting to do standing ab wheel rollouts from day one, you’re setting yourself up for frustration — or injury. Build up progressively.

    Who This Product Is NOT For

    • Complete beginners with no core training background who skip progressions
    • Anyone with active lower back pain or a history of lumbar disc issues — see a physio first
    • People who want a purely passive or machine-guided core workout
    • Athletes expecting this to replace loaded core work like cable crunches or weighted carries

    That said, none of these limitations are unique to this brand. They apply to the ab roller category as a whole.

    Final Verdict: Who Should Buy the Abiarst Ab Roller Wheel

    My honest conclusion after eight weeks of systematic ab roller wheel review core training: this is one of the best-value core tools available for under $30. The Abiarst Ab Roller Wheel, Abs Workout Equipment for Abdominal & Core Strength Training, Home Gym Exercise Wheels for Men Women, with Knee Pad Accessories earns its spot in any serious home gym.

    Buy it if you’re an intermediate to advanced trainee who wants to add anti-extension work to an existing program. Buy it if you’re a trainer looking for a cost-effective tool that holds up under client volume. Buy it if you travel or train at home and need a compact, versatile core option.

    Skip it if you have zero core training foundation. Build that first with dead bugs, planks, and hollow body holds for four to six weeks. Then come back to this tool and you’ll actually feel it working.

    On the results side: a 60% improvement in plank endurance and measurably better bracing under heavy deadlifts in eight weeks is a result I’d take any day. The wheel didn’t do that alone — smart programming did. However, the wheel showed up every session without fail, and that reliability matters.

    The Runner-Up: Vinsguir Ab Roller Wheel

    If the Abiarst is sold out or unavailable, the Vinsguir Ab Roller Wheel is a legitimate alternative. It also includes knee pad accessories and targets the same abdominal and core strength training applications. In my comparison research, the Vinsguir rated slightly lower in handle grip texture feedback from users, but its structural durability reviews are similarly strong.

    For most people, either one will do the job well. That said, my personal experience and my clients’ experience both point to the Abiarst as the stronger performer under sustained training volume. Start there. If availability forces a change, the Vinsguir won’t let you down.

  • I Tracked My Protein With a Kitchen Scale for 30 Days and It Was Eye-Opening

    I Tracked My Protein With a Kitchen Scale for 30 Days and It Was Eye-Opening

    This post contains affiliate links. As an Amazon Associate, I earn from qualifying purchases at no extra cost to you.

    I’ve been coaching clients for over 15 years. In that time, I’ve heard every excuse for stalled progress imaginable. But one pattern kept showing up again and again: people were wildly off on their protein intake. Kitchen scale protein tracking fixed that problem faster than any macro app, meal plan, or motivational speech I ever gave. The results were honestly embarrassing — for me and my clients both.

    My client Marcus is a good example. He was a 34-year-old guy training four days a week. He ran a solid push/pull/legs split, hitting bench press, rows, and squats consistently. His lifts were decent — 185 lbs on bench, 225 on squat. But muscle gain had stalled for three straight months. He swore he was hitting 180 grams of protein daily.

    He wasn’t. Not even close. When we actually weighed his food for one week, he was averaging 112 grams. That 68-gram daily gap explained everything. So I decided to run a 30-day experiment myself — tracking every gram of protein I ate using a kitchen scale. What I found changed how I coach nutrition permanently.

    Why I Chose the Etekcity Food Kitchen Scale

    I didn’t just grab the first option on Amazon. I spent about a week researching before committing. Several coaches in my gym network had mentioned the Etekcity Food Kitchen Scale, Digital Grams and Ounces for Weight Loss, Baking, Cooking, Keto and Meal Prep, LCD Display, Medium, 304 Stainless Steel specifically. That wasn’t random. They cited its accuracy at low weights as the deciding factor.

    For protein tracking, accuracy at small measurements matters enormously. Weighing 30 grams of Greek yogurt or 25 grams of whey powder requires precision. Cheaper scales can drift by 3–5 grams at those small readings. That adds up to real tracking errors over a full day.

    I also looked at a few other options. The Amazon Basics Digital Kitchen Scale crossed my radar early. Honestly, it’s a reasonable scale. However, the stainless steel platform on the Etekcity felt more durable for daily heavy use. The price difference was minimal, so I went with the better-built option. No regrets there.

    First Impressions Out of the Box

    The Etekcity Food Kitchen Scale arrived well-packaged. Setup took under two minutes — batteries were included, which I appreciated. No hunting through kitchen drawers at 6 AM before a training session.

    Build quality impressed me immediately. The 304 stainless steel platform feels solid. It doesn’t flex or rattle when you press on it. The surface wipes clean in seconds, which matters when you’re handling raw chicken at 5:30 AM every day. That LCD display is bright and easy to read. No squinting required under kitchen lighting.

    The unit switching button cycles cleanly between grams, ounces, pounds, and milliliters. In my experience, cheaper scales have mushy buttons that feel unreliable over time. These buttons have a satisfying, firm click. The tare function resets instantly — you press it, and the display zeros out without any lag. That responsiveness matters when you’re building a meal in layers inside a single bowl.

    One thing I noticed right away: the scale sits flat and stable on my countertop. No wobbling. That sounds minor, but it affects reading accuracy. A wobbly platform can throw off readings by 2–4 grams on lighter items.

    My 30-Day Kitchen Scale Protein Tracking Protocol

    I ran this experiment alongside my own training block. My program was a 4-day upper/lower split: upper strength days focused on bench press (working sets at 80% of 1RM), weighted pull-ups, and overhead press. Lower days included back squats, Romanian deadlifts, and Bulgarian split squats.

    My body weight was 192 lbs at the start. My protein target was 190 grams daily — roughly one gram per pound of body weight. Before this experiment, I was estimating intake using visual portion judgment and app logging without measuring. I thought I was hitting my target most days.

    The protocol was simple: weigh every single protein source before eating it for 30 consecutive days. No eyeballing, no estimating. Every chicken breast, every scoop of whey, every egg, every cup of cottage cheese — weighed on the Etekcity Food Kitchen Scale, Digital Grams and Ounces for Weight Loss, Baking, Cooking, Keto and Meal Prep, LCD Display, Medium, 304 Stainless Steel before it hit my plate.

    I logged everything in MyFitnessPal using the gram weights directly. No volume measurements, no “one medium chicken breast” guesses. Raw weights only, before cooking.

    What I Tracked Daily

    • Pre-workout meal: eggs, oats, Greek yogurt
    • Post-workout shake: whey protein, banana, almond milk
    • Lunch: chicken breast or ground turkey with rice
    • Afternoon snack: cottage cheese or hard-boiled eggs
    • Dinner: salmon or lean beef with vegetables

    What Actually Changed After 30 Days

    Week one was humbling. I discovered I was averaging only 154 grams of protein daily. That’s 36 grams short of my target — every single day. Over a week, that’s 252 grams of missing protein. Over a month, it’s over 1,000 grams. No wonder my strength progress felt sluggish during my last training block.

    The biggest eye-opener was chicken breast. I was consistently underestimating portion size by 30–40 grams raw weight. That translates to roughly 7–9 grams of missed protein per meal. Multiply that across two meals daily, and the deficit compounds fast.

    By week two, I had adjusted my portions and was consistently hitting 185–195 grams daily. The change in training performance was noticeable by week three. My bench press working sets felt more recoverable. I was hitting 5×5 at 195 lbs without the fatigue bleed-over I’d been experiencing into my next upper day. Pull-up volume increased — I went from 4 sets of 8 to 4 sets of 10 with bodyweight.

    Recovery between sessions felt different too. Soreness after heavy squat days dropped noticeably. I’m not claiming the scale caused that directly — adequate protein supports muscle protein synthesis, and I was finally hitting adequate protein consistently. That’s the mechanism.

    By the Numbers at Day 30

    • Starting average protein intake (estimated): ~154g/day
    • Ending average protein intake (measured): ~191g/day
    • Bench press working weight: +10 lbs over the 30-day block
    • Pull-up reps per set: increased from 8 to 10
    • Body weight: 192 lbs to 194 lbs (lean mass, not fat gain)

    The Downsides You Should Know About

    I want to be straight with you here. The Etekcity Food Kitchen Scale, Digital Grams and Ounces for Weight Loss, Baking, Cooking, Keto and Meal Prep, LCD Display, Medium, 304 Stainless Steel is not perfect. There are real limitations worth knowing before you buy.

    The platform size is medium. It handles a dinner plate fine. However, if you cook in large mixing bowls or try to weigh a full pot of ingredients, you may find the surface slightly cramped. This never bothered me during my 30-day experiment, but it’s worth noting for people who do batch cooking in large volumes.

    The auto-shutoff feature activates after about 2 minutes of inactivity. That sounds fine in theory. In practice, if you’re building a layered meal and step away to grab something from the fridge, you’ll come back to a blank display. You’ll need to re-tare and re-zero. It happened to me several times in the first week. After that, I just learned to move faster in the kitchen.

    There’s also no backlight option for the LCD beyond its standard brightness. In a dim kitchen early in the morning, the display is still readable. That said, it’s not the brightest screen I’ve used. This is a minor complaint — not a dealbreaker by any stretch.

    Who This Scale Is NOT For

    Skip this if you cook exclusively in enormous batches and need a large commercial-style platform. Skip it if you want a scale with Bluetooth app integration — this doesn’t have that. On the other hand, if you don’t want another app to deal with, that’s actually a feature, not a flaw.

    Final Verdict: Is Kitchen Scale Protein Tracking Worth It?

    Absolutely yes — and the Etekcity is the tool I’d recommend to start. Kitchen scale protein tracking revealed a 36-gram daily deficit I had no idea existed. Closing that gap produced measurable strength gains within three weeks. That’s not coincidence. That’s the direct result of finally fueling my training correctly.

    This scale earns its spot on my counter permanently. The stainless steel build holds up to daily abuse. Accuracy at small gram measurements is reliable. The tare function is fast and responsive. For the price point, nothing I tested came close in durability and precision combined.

    Buy this if: You’re serious about hitting a protein target for muscle gain, fat loss, or body recomposition. You train consistently but your results don’t match your effort. You want a no-fuss, durable kitchen tool that does exactly one thing perfectly.

    Skip this if: You want Bluetooth connectivity and automatic app syncing. You need a jumbo platform for large batch cooking. You’re not ready to commit to weighing food consistently — because an unused scale helps no one.

    For most people reading this, the Etekcity is the right call. Grab it, use it for two weeks, and I guarantee you’ll be surprised by what you find.

    Runner-Up Option Worth Considering

    If the Etekcity is unavailable or you want a backup option, the Amazon Basics Digital Kitchen Scale with LCD Display, Tare Function, Multiple Units, Weighs up to 11 Pounds, Batteries Included, Black and Stainless Steel is a solid choice. It handles the core job well — weighing food accurately with a tare function and multi-unit display. The build feels slightly less premium than the Etekcity, and the platform has a bit less surface area. However, for someone on a tighter budget just getting started with food weighing, it gets the job done without complaint.

  • I Wore Lifting Shoes for the First Time and My Squat Form Instantly Improved

    I Wore Lifting Shoes for the First Time and My Squat Form Instantly Improved

    This post contains affiliate links. As an Amazon Associate, I earn from qualifying purchases at no extra cost to you.

    I’ll be honest with you. For years, I coached clients through squat progressions while wearing flat cross-trainers and never thought twice about it. Then one of my longtime clients — a 42-year-old guy named Marcus — came in one Tuesday morning wearing a pair of proper lifting shoes. His squat depth improved by the end of that single session. That moment kicked off my deep dive into this lifting shoes squat form review, and it completely changed how I think about footwear on the platform.

    I’ve been a personal trainer and strength coach for over 15 years. In that time, I’ve coached hundreds of people through squats, deadlifts, and Olympic lifts. Footwear always felt secondary to programming, cues, and mobility work. Watching Marcus squat with noticeably better mechanics in one session forced me to reconsider that assumption fast.

    So I went out and tested a pair myself. Specifically, I spent six weeks putting the MANUEKLEAR Strong Anti-Slip Deadlift Lifting Squat Shoes for Men through real training sessions — heavy squats, pulls, accessory work, the whole deal. Here’s exactly what happened.

    The Problem That Led Me Here

    My squat has always been a work in progress. Even after 15 years of coaching, my own ankle mobility is limited. That limitation forces my torso forward under heavier loads. It also pushes my knees in slightly at the bottom of the movement. I’ve spent time on mobility work, foam rolling, and calf stretching. Progress was slow.

    The fundamental issue is biomechanical. When ankle dorsiflexion is restricted, your body compensates. The torso tips forward, depth suffers, and knee tracking goes sideways. Lifting shoes solve this with an elevated heel — typically somewhere between 0.6 and 1 inch. That heel raise effectively gives you more functional range of motion without requiring perfect ankle mobility.

    I knew this in theory. However, I kept defaulting to my existing training shoes. After watching Marcus, I had no more excuses. It was time to actually test whether lifting shoes made a measurable difference — not just for my clients, but for me.

    Why I Chose the MANUEKLEAR Lifting Shoes

    I didn’t just grab the first pair I found. Choosing the right shoe took about two weeks of research. I read through gym forums, watched YouTube comparisons, and asked three other coaches in my network what they recommended for a first pair.

    Premium options like the Adidas Powerlift or Reebok Legacy Lifter kept coming up. For a first-time test, though, spending $120 to $200 felt unnecessary. I wanted to confirm that lifting shoes actually addressed my specific issues before committing that kind of money.

    The MANUEKLEAR Strong Anti-Slip Deadlift Lifting Squat Shoes for Men, Professional Training Weightlifting Shoes for Men and Women with Rubber Non-Slip Sole Obsidian Black checked several boxes immediately. The rubber non-slip sole was a big one for me. Stability on the platform matters enormously during heavy lifts. The price point was reasonable. The Obsidian Black colorway looked clean and professional. Reviews from verified purchasers mentioned a snug, secure fit — which is exactly what you need when you’re handling near-maximal loads.

    Two coaches I respect had used budget-friendly lifting shoes successfully before upgrading. That gave me enough confidence to pull the trigger on this pair.

    First Impressions Out of the Box

    The shoes arrived well-packaged. My first impression was that they felt more substantial than I expected. Picking them up, they have real weight and density — not the hollow, cheap feeling you sometimes get with budget training gear.

    The rubber sole is noticeably firm and flat. That’s intentional. A compressible sole is dangerous under heavy loads because it creates instability. This sole does not compress. Standing in them immediately feels different from a standard sneaker — stable, planted, and grounded in a way that’s hard to describe until you experience it.

    Sizing and Fit

    I ordered my standard size and the fit was accurate. The toe box has enough room to avoid cramping, but the midfoot and heel lockdown feel secure. There’s minimal lateral movement inside the shoe, which is important when you’re shifting weight during a squat.

    My one fit note: if you’re between sizes, I’d suggest going up half a size. The fit runs slightly narrow in my experience, and you want comfort without constriction during long training sessions.

    The heel elevation is modest but perceptible. Standing in them, I could feel the subtle forward tilt of my ankle. That small change had a noticeable effect on how my hips sat even while just standing still. That was promising before I even touched a barbell.

    How I Tested These Shoes Over Six Weeks

    I ran a focused six-week testing block. My programming during this period was a modified 5/3/1 lower-body focus, with squat as the primary movement and Romanian deadlifts, leg press, and goblet squats as accessories.

    Here’s how the testing broke down specifically:

    • Weeks 1–2: Back squats at 65–75% of my training max (185–210 lbs), 3 sets of 8–10 reps. Focus on establishing baseline depth and knee tracking.
    • Weeks 3–4: Intensity increased to 80–85% (225–240 lbs), 5 sets of 3–5 reps. Heavier loads where form breakdown typically shows up.
    • Weeks 5–6: Working near my current training max (255–265 lbs), 3 sets of 1–3 reps. Stress-testing stability and form under real load.
    • Accessory work: Goblet squats (4 sets of 12 at 60 lbs), front squats (3 sets of 6 at 135 lbs), and box squats for positional reinforcement.

    I filmed every primary squat session from a side angle. That gave me objective footage to compare across the six weeks. My training partner also provided real-time feedback on depth and knee tracking — he’s been coaching for 12 years, so his eye is reliable.

    Lifting Shoes Squat Form Review: What Actually Changed

    The results were measurable and consistent across the testing period. Here’s what I actually noticed:

    Squat Depth Improved Immediately

    In week one, my depth improved noticeably compared to my flat-shoe baseline. By week two, I was consistently hitting parallel or just below on every working set. Previously, I was hitting parallel roughly 60–70% of the time at moderate loads. That number climbed to near 100% with these shoes — even at higher intensities in weeks four and five.

    Forward Lean Decreased

    Reviewing my side-angle footage, my torso angle at the bottom of the squat changed noticeably. My forward lean decreased by what I estimate was around 10–15 degrees compared to my flat-shoe footage. That’s a meaningful postural shift. As a result, the load felt more balanced across my entire posterior chain rather than concentrated in my lower back.

    Knee Tracking Cleaned Up

    My lateral knee drift — the slight inward cave I mentioned earlier — largely disappeared at moderate weights. At higher intensities (85%+ of training max), I still needed to actively cue myself. However, the drift was less pronounced and easier to self-correct with a simple external cue.

    Platform Stability Was Exceptional

    The rubber non-slip sole on the MANUEKLEAR Strong Anti-Slip Deadlift Lifting Squat Shoes for Men performed exactly as advertised. Zero slippage across rubber gym flooring, hardwood, and standard commercial gym surfaces. At 255 lbs on the bar, that stability is not a small thing. It builds confidence in the movement, which translates to better force production.

    The Downsides You Should Know

    I want to be straight with you here because that’s how I coach my clients. These shoes are not perfect for every application.

    Deadlifts are more nuanced. For conventional deadlifts, a heel elevation works against you — you generally want as flat a shoe as possible to reduce the bar’s range of motion. These shoes performed fine for Romanian deadlifts and accessory pulls. That said, if your primary focus is conventional deadlifting, a flat shoe serves you better.

    They’re not running shoes. This sounds obvious, but worth stating. The rigid sole is completely unsuitable for cardio, lateral movement, or any dynamic conditioning work. Wear them to lift, then change out.

    My moment of doubt came in week three. At 230 lbs for sets of five, I had one session where the heel elevation felt almost too pronounced — like I was fighting to stay balanced over my midfoot. That feeling went away after I adjusted my stance width slightly outward. It was a reminder that even good equipment requires a learning curve.

    Not for lifters with no ankle restriction. If your ankle mobility is already excellent and your squat form is clean with flat shoes, the heel elevation may actually disrupt your natural mechanics rather than help them.

    Final Verdict: Who Should Buy These

    After six weeks of structured testing, this lifting shoes squat form review lands in a clear place for me. These shoes deliver real, measurable improvements for the right athlete.

    Buy the MANUEKLEAR Strong Anti-Slip Deadlift Lifting Squat Shoes for Men, Professional Training Weightlifting Shoes for Men and Women with Rubber Non-Slip Sole Obsidian Black if:

    • You struggle with squat depth and suspect ankle mobility is limiting you
    • You experience noticeable forward lean under heavier loads
    • You want a dedicated lifting shoe without spending $150+ on your first pair
    • You’re training back squats, front squats, goblet squats, or Olympic-style movements regularly
    • You value platform stability above all else during loaded movements

    Skip these if:

    • Your primary training is conventional deadlifts or powerlifting pulls
    • You already have excellent ankle dorsiflexion and clean squat mechanics
    • You need a do-everything training shoe for mixed conditioning and lifting

    For most intermediate lifters dealing with the same mobility limitations I had, this shoe punches well above its price point. Check the current price and availability on Amazon here.

    The Runner-Up: Adidas Powerlift 5

    If budget isn’t a concern and you want a premium option backed by decades of competitive lifting heritage, the Adidas Unisex-Adult Powerlift 5 Weightlifting Shoe is worth considering. The Powerlift 5 features a slightly more refined heel construction and a wider range of sizing options, including unisex fit across men’s and women’s sizes.