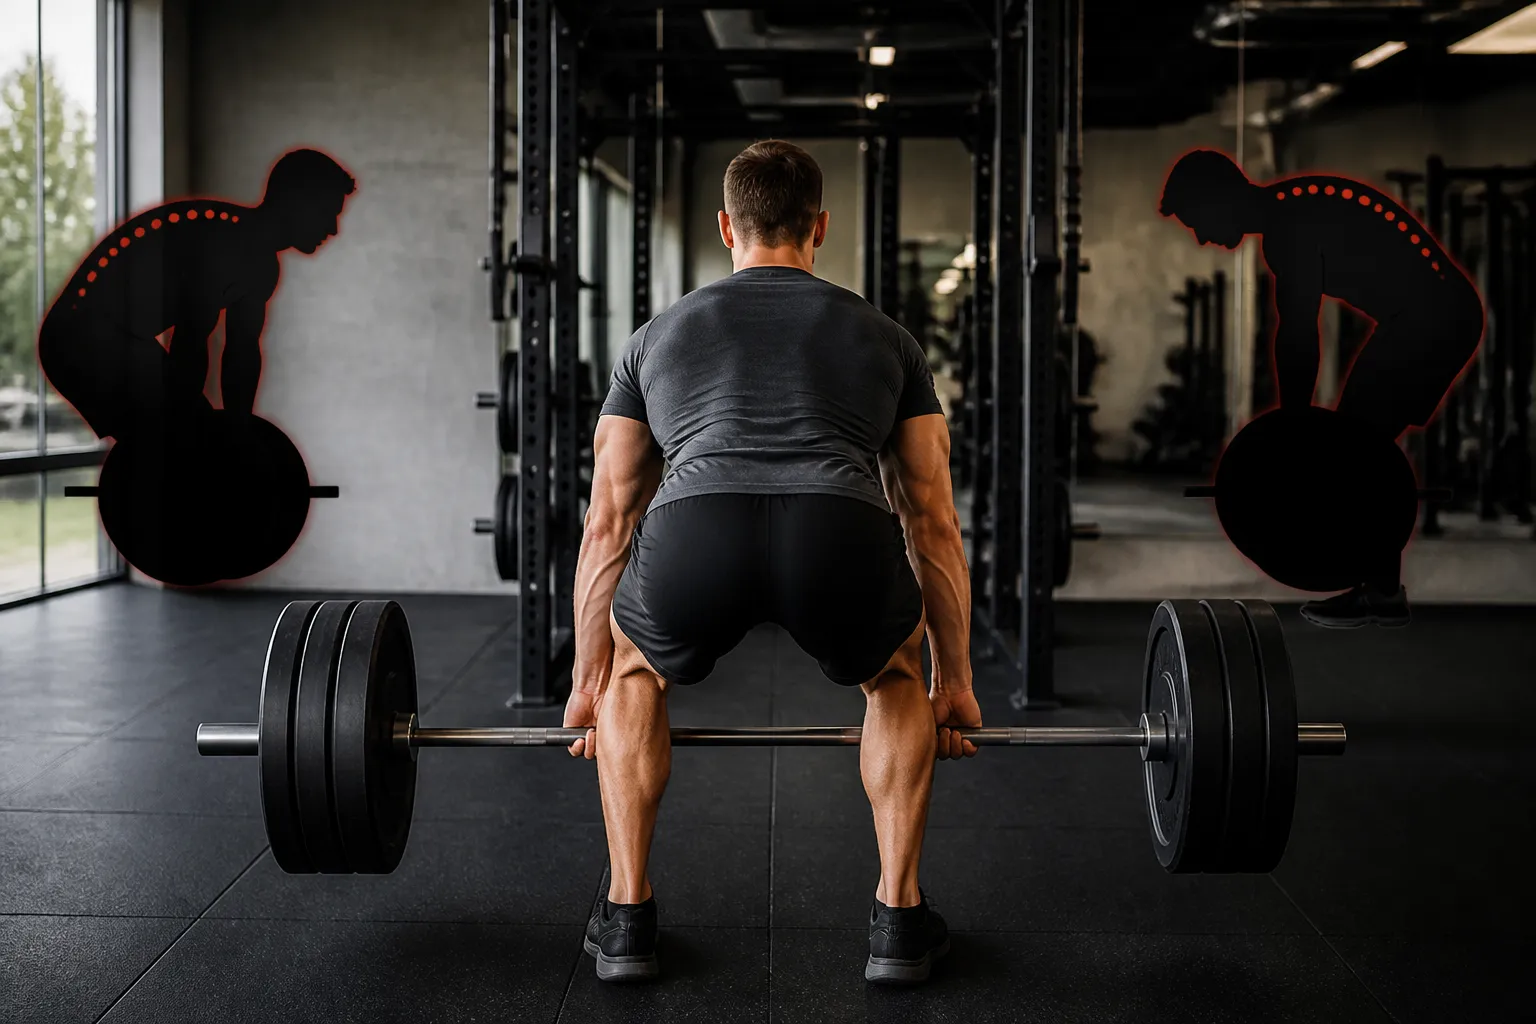
Blog

  • Push Pull Legs Routine: The Best Workout Split for Building Muscle

    Push Pull Legs Routine: The Best Workout Split for Building Muscle

    This post contains affiliate links. As an Amazon Associate, I earn from qualifying purchases at no extra cost to you.

    If you ask me what the single best training split is for intermediate to advanced lifters, I’ll give you the same answer every time: push pull legs. It’s not trendy. It’s not complicated. It works — and the volume of research and real-world results behind it backs that up completely. The push pull legs split organizes your training around movement patterns and muscle groups in a way that maximizes recovery, minimizes overlap, and lets you hit each muscle with enough frequency and volume to drive consistent progress. Whether your goal is building muscle, gaining strength, or both, this is the framework I come back to again and again.

    What Is Push Pull Legs?

    Push pull legs is a training split that divides your workouts into three categories based on how your muscles function during movement. It’s elegant in its simplicity, and that’s a big part of why it works so well.

    • Push Day targets your chest, shoulders, and triceps — all the muscles involved in pushing movements like the bench press and overhead press.
    • Pull Day targets your back, biceps, and rear delts — muscles engaged during pulling movements like rows, pull-ups, and deadlifts.
    • Leg Day targets your quads, hamstrings, glutes, and calves — the full lower body in a single dedicated session.

    You can run this PPL split two different ways. The 6-day version has you training Monday through Saturday in a Push/Pull/Legs/Push/Pull/Legs pattern, which is ideal if you’re an experienced lifter who can handle high volume and recover well. The 3-day version spreads the three sessions across the week — think Monday, Wednesday, Friday — which works better for lifters who are still building their work capacity or have a busier schedule. Both approaches are effective. Your recovery, lifestyle, and training age determine which one is right for you.

    The Complete Push Pull Legs Routine

    Below is the exact push pull legs routine I recommend to intermediate lifters. The exercise selection, rep ranges, and set volumes are all chosen with both muscle growth and long-term joint health in mind. Follow progressive overload — add weight or reps week over week — and this program will deliver results for months.

    Push Day — Chest, Shoulders, Triceps

    • Bench Press — 4 sets x 6–8 reps
    • Overhead Press — 3 sets x 8–10 reps
    • Incline Dumbbell Press — 3 sets x 10–12 reps
    • Lateral Raises — 3 sets x 15 reps
    • Tricep Pushdowns — 3 sets x 12 reps
    • Overhead Tricep Extension — 2 sets x 12 reps

    Tracking your lifts is something I consider non-negotiable on a push pull legs routine — and that’s where having a dedicated workout journal makes a real difference. I’ve been recommending the Fitness Workout Journal for Women & Men to my clients for a while now because it strikes the right balance between structure and flexibility. The A5 format fits easily in a gym bag, and the layout makes it simple to log sets, reps, and weights for every exercise in this program. When you’re chasing progressive overload session after session across three different training days, having a written record isn’t optional — it’s how you actually make progress.

    Pull Day — Back, Biceps, Rear Delts

    • Deadlifts — 3 sets x 5 reps (or Barbell Rows — 4 sets x 6–8 reps)
    • Pull-Ups — 3 sets x AMRAP
    • Seated Cable Rows — 3 sets x 10–12 reps
    • Face Pulls — 3 sets x 15–20 reps
    • Barbell Curls — 3 sets x 10 reps
    • Hammer Curls — 2 sets x 12 reps

    Pull day is your most taxing session of the week, especially if you’re deadlifting heavy. Nutrition timing around this session matters, and protein intake post-workout is a real factor in recovery. This is where a quality shaker bottle becomes a practical piece of equipment, not just an accessory. The VELOMIX 2-Pack 28 oz Protein Shaker Bottles are what I keep in my gym bag. The dual wire whisk design mixes protein powder cleanly with no clumps, the 28 oz capacity is generous enough for a proper post-workout shake, and getting two bottles in one pack means you always have a clean one ready to go. Leak-proof construction is something I won’t compromise on, and these deliver.

    Leg Day — Quads, Hamstrings, Glutes, Calves

    • Squats — 4 sets x 6–8 reps
    • Romanian Deadlifts — 3 sets x 8–10 reps
    • Leg Press — 3 sets x 10–12 reps
    • Walking Lunges — 3 sets x 12 reps per leg
    • Leg Curls — 3 sets x 12 reps
    • Standing Calf Raises — 4 sets x 15 reps

    Leg day in a push pull legs routine is a grind, and staying hydrated through the session makes a noticeable difference in performance and endurance. I’ve been using the BlenderBottle Strada Insulated Stainless Steel Shaker Cup on heavy training days and it’s genuinely impressive. The insulated stainless steel construction keeps cold drinks cold for hours, which matters when you’re ninety minutes deep into squats and Romanian deadlifts. It also doubles as a clean shaker for intra-workout amino acids or post-session protein. The 24-ounce size is compact enough to sit on the rack beside you without being in the way. Most of my clients who train seriously end up with one of these.

    How to Customize PPL for Your Goals

    One of the biggest strengths of the push pull legs split is how adaptable it is. The structure stays the same — you’re always organizing training by push, pull, and legs — but the variables inside that structure flex based on what you’re chasing.

    Training for Strength

    If strength is the primary goal, shift your rep ranges down to 3–6 on the main compound lifts — bench press, overhead press, deadlifts, and squats. Rest periods should be longer, typically 3 to 5 minutes between heavy sets, to allow full neuromuscular recovery before the next effort. Keep the accessory work slightly higher in reps to maintain muscle balance without crushing your recovery. Progressive overload here means adding weight to the bar as the priority.

    Training for Hypertrophy

    For muscle growth, the moderate rep range of 8–12 is your primary zone, with rest periods of 60 to 90 seconds between sets to keep metabolic stress elevated. This is where the accessory movements in the routine — lateral raises, face pulls, hammer curls, calf raises — become especially important. Volume drives hypertrophy, so make sure you’re hitting that weekly target across both sessions if you’re running the 6-day version.

    3-Day vs 6-Day PPL: Which One Is Right for You?

    The 3-day version is the right starting point if you’ve been training for less than two years, if your recovery between sessions is slow, or if life simply doesn’t allow for six gym days per week. Each muscle group gets hit once per week, which is still enough stimulus to grow — especially if your nutrition and sleep are dialed in. The 6-day version is appropriate if you’re an experienced lifter who can recover from higher weekly volume, wants to hit each muscle group twice per week, and can commit to six sessions consistently. Twice-weekly frequency has a meaningful edge for hypertrophy in well-trained individuals, so the 6-day approach is worth the investment if you’re ready for it.

    Whether you’re running 3 days or 6, logging your workouts consistently is how you bridge the gap between effort and progress. The Nextnoid Hardcover Fitness Journal Workout Planner is one I recommend specifically because the hardcover construction holds up to daily gym use without falling apart after a few weeks. The A5 format is practical, the layout supports structured logging for both gym and home workouts, and the build quality is noticeably better than standard spiral-bound alternatives. If you’re serious about running this push pull legs routine with real accountability, this journal earns its place in your bag.

    PPL vs Upper/Lower vs Full Body: Which Split Is Best?

    The honest answer is that the best split is the one that fits your training age, schedule, and recovery capacity. But here’s how the three main options compare in practical terms.

    Full body training works best for beginners. Hitting every muscle group three times per week with relatively low per-session volume is ideal for building the neuromuscular foundation that makes all future training more effective. If you’ve been training seriously for less than a year, start here.

    Upper/lower splits are a strong middle ground for lifters who’ve outgrown full body but aren’t yet managing the volume demands of push pull legs. Four days per week, each muscle group hit twice, with manageable session lengths — it’s an efficient and well-researched approach for early intermediate lifters.

    Push pull legs is where intermediate to advanced lifters live. The higher per-muscle volume, logical grouping by movement pattern, and flexibility to run 3 or 6 days makes it the most scalable and effective option for anyone past the beginner stage. If you’ve been training consistently for 1.5 to 2 years or more and you’re ready to take volume and structure seriously, the push pull legs routine is the split I’d put you on first.

    Final Thoughts

    Push pull legs has earned its reputation as one of the most effective training frameworks in evidence-based fitness — and after years of coaching and personal training experience, I’d agree completely. The structure is logical, the recovery balance is smart, and the flexibility to run it across 3 or 6 days makes it accessible to a wide range of lifters. Follow the routine outlined here, track your progress religiously, fuel your sessions properly, and stay consistent. That formula works. Start with the 3-day version if you need to, graduate to the 6-day when you’re ready, and let the program do what it’s designed to do.

  • How to Squat Properly: The Definitive Barbell Squat Guide

    How to Squat Properly: The Definitive Barbell Squat Guide

    This post contains affiliate links. As an Amazon Associate, I earn from qualifying purchases at no extra cost to you.

    If I had to pick one exercise that every lifter — beginner or advanced — needs to master, it’s the squat. It builds more total muscle mass, demands more full-body coordination, and transfers to more real-world movement patterns than almost anything else you can do under a barbell. But here’s the catch: the squat is also the most technique-dependent lift in the gym. Done well, it’s transformative. Done poorly, it’s a fast track to knee pain, lower back strain, and wasted training. That’s why learning how to squat correctly from the start isn’t optional — it’s the whole game. In this guide, I’m going to walk you through every element of squat form so you can train heavier, move better, and stay injury-free for the long haul.

    Squat Setup: Bar Position, Stance, and Grip

    Before you touch the bar, you need a plan. The decisions you make during setup determine everything that happens on the way down and back up.

    High Bar vs. Low Bar

    High bar positioning places the barbell across the upper traps, just below the base of the neck. It produces a more upright torso and is the go-to for Olympic lifters, athletes, and most general fitness trainees. Low bar positioning sits the bar two to three inches lower, across the rear deltoids, which shifts the torso forward and allows more weight to be moved — making it the preferred setup for most powerlifters. Neither is universally superior. If you’re training for athletic performance or body composition, start with high bar. If your primary goal is maximal strength and competition, low bar is worth learning.

    Stance Width and Foot Angle

    Stance width is not one-size-fits-all — it’s anatomy-dependent. A shoulder-width stance works well for most people, but lifters with wider hips or deeper hip sockets often squat better with a slightly wider stance. Experiment within a range of shoulder-width to just outside shoulder-width. As for foot angle, point your toes out somewhere between 15 and 30 degrees. This toe-out position matches the natural angle of your femurs and allows your knees to track directly over your toes throughout the movement. Forcing your feet straight forward is a common mistake that restricts depth and puts unnecessary stress on the knee joint.

    Grip and Wrist Position

    Your grip width should be just wide enough to allow your elbows to drive down and back without shoulder discomfort. A thumbless or “suicide” grip is common among experienced lifters, but a full grip works perfectly fine. The critical point is wrist position: do not let your wrists bend back under the bar. Keep them neutral and straight. Bent wrists under load lead to forearm and elbow pain over time. If achieving this position is difficult, widen your grip slightly and work on shoulder and thoracic mobility.

    How to Squat: Step-by-Step Execution

    The Walkout

    Unrack the bar by taking it out in no more than two to three steps. Step back with one foot, bring the other foot to your squat stance, and make one final micro-adjustment if needed. That’s it. Every extra step you take is wasted energy and an opportunity to lose your setup. Once you’re in position, don’t drift forward or shuffle around — own your stance before you descend.

    Bracing

    Before every single rep, take a deep diaphragmatic breath — breathe into your belly, not your chest — and brace your entire core as hard as you can, as if you’re about to take a punch to the stomach. This intra-abdominal pressure creates a rigid column of support for your spine. Don’t just breathe in; brace outward in all directions. This is the Valsalva maneuver, and it is non-negotiable for safe, strong squatting under load.

    The Descent

    Initiate the squat by breaking at the hips and knees simultaneously — not by pushing the knees forward first, and not by hinging at the hips like a deadlift. Both joints move at the same time. As you descend, keep your chest up, your knees tracking over your toes (not collapsing inward), and your weight distributed across your entire foot — heel, ball, and toes all in contact with the floor. Think about “spreading the floor” with your feet as you go down. This cue activates your glutes and keeps your knees in proper alignment.

    Depth

    Proper squat form requires reaching at least parallel — meaning the hip crease drops to the level of the top of your knee or below. This is the range of motion at which the glutes and hamstrings are maximally recruited. Quarter squats are not squats. If mobility is limiting your depth, I’ll cover that in detail below. But the goal is always hip crease at or below parallel.

    The Drive Up

    Out of the hole, think “chest up and knees out” simultaneously. Drive your feet through the floor, push your hips forward, and maintain that braced torso all the way to lockout. Your hips and shoulders should rise at the same rate — if your hips shoot up first, your chest falls forward and you’ve turned your squat into a good morning. Exhale at the top once you’ve locked out, reset your brace, and go again.

    Footwear plays a bigger role in squat execution than most people realize. I recommend the MANUEKLEAR Deadlift Shoe – Weight Lifting Shoes for Men Women as a versatile flat-soled option for lifters who want a stable, zero-drop platform under the bar. The barefoot-style sole keeps your foot in full contact with the floor, which improves proprioception and prevents the energy loss you get from training in soft-soled running shoes. I’ve had several clients switch to these and immediately notice better stability and a more grounded feel during their drive phase. They’re also cross-trainer friendly, so they pull double duty on days when you’re moving between squat racks and conditioning work.

    The Most Common Squat Mistakes

    Butt Wink

    Butt wink refers to posterior pelvic tilt at the bottom of the squat — the pelvis tucks under and the lower back rounds. A small amount is normal and not dangerous at light loads, but excessive rounding under heavy weight significantly increases lumbar disc stress. The most common cause is limited ankle or hip mobility preventing a full, neutral-spine descent. Don’t just squat shallower to avoid it — address the mobility restriction directly.

    Valgus Collapse (Knees Caving In)

    Knee cave — where the knees track inward on the descent or drive — is one of the most dangerous and most common errors in how to squat. It places massive rotational stress on the knee joint and is a leading cause of ACL and meniscus injuries over time. The fix is twofold: cue “knees out” aggressively on every rep, and strengthen your hip abductors and glute medius with accessory work like banded squats, clamshells, and lateral band walks.

    The Good Morning Squat

    This happens when your hips rise faster than your shoulders out of the hole, causing your torso to fall forward and the lift to convert into a hip hinge. It’s usually a sign of quad weakness relative to the posterior chain. The fix is paused squats, tempo squats, and front squats to force a more upright position and build quad-dominant strength patterns.

    Not Hitting Depth

    Partial range of motion squats reduce glute activation, limit muscle development, and teach your nervous system to stop short. If you’re not hitting at least parallel, you’re leaving the best results on the table. Record yourself from the side — most lifters who think they’re hitting depth are not.

    Excessive Forward Lean

    Some forward lean is natural and unavoidable, especially with a low bar setup. But if your torso is nearly horizontal, it’s typically caused by ankle mobility restrictions, weak upper back, or incorrect bar placement. Improving ankle dorsiflexion and reinforcing “chest up” as a setup cue will correct this in most cases.

    If knee discomfort is part of your squat story, compression sleeves can make a real difference in how your joints feel under load. Most of my intermediate and advanced clients train in the Gymreapers Knee Sleeves (1 Pair) with Gym Bag, and I keep a pair in my own gym bag. These are 7mm neoprene IPF-approved sleeves that provide genuine compression and warmth to the knee joint — not just a psychological crutch. The added proprioceptive feedback they provide helps many lifters maintain better tracking and knee alignment, particularly during heavy working sets. The included gym bag is a nice touch that keeps them from stinking up your kit.

    Can’t Squat Deep? Here’s Why

    Ankle Mobility Limitations

    Limited ankle dorsiflexion is the number one reason lifters can’t hit depth without their heels rising or their torso pitching forward. Test it by trying a deep squat barefoot — if your heels come up, your ankles are the problem. Fix it with daily ankle stretching (banded ankle mobilizations, wall ankle stretches), calf foam rolling, and in the short term, elevate your heels slightly with plates while you build mobility. Consistency over weeks is what moves the needle here, not one session of stretching.

    Hip Mobility

    Tight hip flexors and limited hip internal rotation can both restrict your ability to descend into a deep squat without butt wink or groin discomfort. The goblet squat hold at the bottom is one of my favorite corrective tools — use a light dumbbell or kettlebell, sink into a deep squat, use your elbows to push your knees out, and hold for 30–60 seconds. Add 90/90 hip stretches and pigeon pose into your daily warm-up routine to address capsular and soft tissue restrictions over time.

    When to Use Squat Shoes

    Weightlifting shoes with an elevated heel are one of the most effective tools for improving squat depth immediately. The raised heel effectively compensates for limited ankle dorsiflexion, allowing you to stay more upright and hit greater depth without any lower back rounding. They’re particularly valuable for high bar squats, Olympic lifting, and anyone with naturally limited ankle range of motion. I recommend the Adidas Unisex-Adult Powerlift 5 Weightlifting Shoe as a best-in-class option for most lifters. The Powerlift 5 features Adidas’s signature raised heel platform and a wide, flat sole that creates exceptional stability at the bottom of the squat. They’re what I personally lace up on squat days, and they’ve been a game-changer for clients who previously struggled to hit depth consistently.

    For lifters dealing with chronic knee discomfort or who want extra joint support during maximal efforts, knee wraps offer another layer of protection beyond sleeves. The DMoose Fitness Knee Sleeves for Weightlifting — which also come in a wrap configuration — are USPA and IPL approved and designed specifically for the compressive demands of squatting and powerlifting. What sets them apart is the 78-inch length that allows you to customize tightness and support based on your load and comfort level. I typically recommend these to lifters who are pushing near-maximal weights or coming back from a knee injury and need both stability and confidence under the bar.

    Final Thoughts on Squat Form

    Learning how to squat well is a process, not a one-time event. Even experienced lifters benefit from filming their sets, working with a coach, and regularly revisiting the fundamentals. Proper squat form is what separates lifters who make steady progress year over year from those who plateau and get hurt. Get your setup right, brace hard, hit depth, and address your mobility restrictions before piling more weight on the bar. The squat rewards patience and precision — put in the work on technique now, and the strength gains will follow.

  • How to Bench Press With Proper Form: From Setup to Lockout

    How to Bench Press With Proper Form: From Setup to Lockout

    This post contains affiliate links. As an Amazon Associate, I earn from qualifying purchases at no extra cost to you.

    The bench press is the single most popular exercise in the gym — and also one of the most commonly butchered. Walk into any commercial gym on a Monday and you’ll see dozens of people loading up the bar, flaring their elbows, bouncing the bar off their chest, and wondering why their shoulders ache every Tuesday morning. Learning how to bench press correctly isn’t just about ego or aesthetics. It’s about building real, transferable upper body strength while keeping your shoulders, wrists, and elbows healthy for years to come. Whether you’re a complete beginner or someone who’s been training for years with sloppy habits, this guide will break down every element of bench press form from the ground up.

    Bench Press Setup: The Foundation of a Good Rep

    Most people treat the setup like an afterthought — they lie down, grab the bar, and go. That’s a mistake. The setup determines everything. A solid, repeatable setup is what separates lifters who progress consistently from those who stall and get hurt.

    Foot Position

    Plant your feet flat on the floor, roughly hip-width apart, and drive them into the ground throughout the entire lift. Your legs aren’t just sitting there — they’re actively contributing to stability and leg drive. Some lifters tuck their feet back toward their hips to increase arch and lat engagement, which is valid, but beginners should start with a flat-footed stance until the rest of the movement is dialed in.

    Back Arch

    Let’s clear something up: a natural arch in the lower back is not only acceptable during the bench press — it’s correct. A flat back with your spine pressed into the bench is actually a less stable, less powerful position that puts more stress on the anterior shoulder. You’re not trying to do a full powerlifting arch off the bench; you’re simply maintaining the natural curve of your lumbar spine. Your glutes and upper back should stay in contact with the bench at all times.

    Shoulder Blades: Retracted and Depressed

    Before you touch the bar, squeeze your shoulder blades together and pull them down toward your back pockets. This is what coaches call the “packed” or “pockets” position. Doing this shortens the range of motion slightly, creates a stable shelf for the bar path, and — most importantly — protects your rotator cuff by keeping the shoulder joint in a mechanically sound position. If your shoulder blades are winging off the bench during the press, you’ve lost your base.

    Grip Width

    A grip roughly 1.5 times your shoulder width works well for the majority of lifters. On a standard Olympic bar, most people end up with their index fingers just outside the smooth center knurling, or with their pinkies on the power rings. A grip that’s too wide increases shoulder stress; a grip that’s too narrow shifts load entirely to the triceps and changes the movement pattern entirely. Find your width, mark it mentally, and use it consistently every session.

    Unracking the Bar

    Lock your arms out completely before you lift the bar off the hooks. Then shift it horizontally so it’s positioned directly over your chest — not your face, not your belly. This is your starting position. Every rep begins and ends here.

    One thing I always tell my clients before they even touch the bar: protect your wrists. If you’re pressing any meaningful weight, your wrists will take a beating if they’re allowed to hyperextend backward under load. This is where a quality pair of wrist wraps makes a genuine difference. I personally recommend the Fitgriff® Wrist Wraps for Weightlifting (18″) for anyone who is serious about their bench press setup. The 18-inch length gives you enough coverage to keep the wrist locked in a neutral position without restricting hand movement, and the heavy-duty material holds up under repeated use. I keep a pair in my gym bag and hand them to clients the moment they start working with heavier loads.

    How to Bench Press: Step-by-Step

    Now that you’re set up correctly, here’s exactly how to bench press through the full range of motion.

    Step 1: Lower the Bar with Control

    Take a deep breath into your belly (not your chest), brace your core like you’re about to take a punch, and begin lowering the bar. The bar should travel in a very slight diagonal arc — not perfectly straight down. Your elbows should track at roughly 45 to 75 degrees from your torso. The exact angle will depend on your anatomy, but the key rule is this: elbows should never flare out to 90 degrees. That position is a direct path to shoulder impingement. Think “tuck slightly” rather than “flare out.”

    Step 2: Touch the Chest

    Lower the bar to your nipple line — the lower portion of the chest, not the collarbone. The bar should make light contact with your chest on every rep. No bouncing. No half-reps. A brief, controlled pause at the bottom is one of the best ways to build honest strength and eliminate momentum from the equation.

    Step 3: Press Up and Back

    Drive the bar up and very slightly back toward the rack, returning it to the lockout position over your chest. Keep your shoulder blades packed throughout the press. At the top, arms are extended — not hyperextended — and the bar is back over your starting position, ready for the next rep.

    Step 4: Use Your Legs

    Leg drive isn’t just a powerlifting technique. Even as a recreational lifter, actively pressing your feet into the floor during the concentric phase creates full-body tension that translates into a stronger, more stable press. Think about pushing the floor away from you as you press the bar up. It takes practice, but once you feel it, you won’t press without it.

    If you’re someone who wants to work on specific portions of the lift — say, the lockout or the bottom range — press blocks are an incredibly underrated tool. Most of my clients who plateau mid-lift get a lot of value from adjustable board work. The Bench Press Block Press Boards (Adjustable 2-5 Board) let you limit the range of motion in a controlled way, helping you overload specific sticking points without compromising form. The adjustable 2-to-5 board design means you get multiple training variations out of a single piece of equipment — that’s smart value for a home gym setup.

    Common Bench Press Mistakes That Cause Injury

    Understanding proper bench press form also means understanding what breaks it. These are the five mistakes I see most often — and the ones most likely to put you on the injured list.

    • Flared elbows at 90 degrees: This is the number one cause of bench-related shoulder injuries. When your elbows are perpendicular to your torso, the shoulder joint is in an impingement-prone position under heavy load. Tuck your elbows to a 45–75 degree angle and your shoulders will thank you.
    • Pressing with a completely flat back: As I mentioned in the setup section, removing the natural arch from your lower back actually increases anterior shoulder stress and reduces your ability to generate force. Maintain your natural lumbar curve.
    • Bouncing the bar off your chest: This turns a strength exercise into a momentum exercise. It also risks serious rib and sternum injury under heavy load. Lower under control, pause, and press.
    • Uneven grip or lopsided pressing: If one hand drifts wider than the other, your bar path will rotate and one shoulder will take disproportionate load. Use the knurling marks on the bar as a reference point every single set.
    • No spotter or safety pins: Training to failure alone on a flat bench is genuinely dangerous. Always use a spotter, or set your safeties at chest height if you’re in a power rack. No lift is worth a dropped bar.

    For lifters who are also incorporating barbell work on bench day — hip thrusts, squats, or lunges as accessory movements — I want to mention one piece of kit that doesn’t get nearly enough credit. The POWER GUIDANCE Square Hip Thrust Pad Barbell Squat Pad is something I recommend to almost everyone doing barbell hip thrusts or heavy squats on the same training day. The square design keeps it from rolling off the bar mid-set, and the dense foam padding distributes barbell pressure evenly so you’re not fighting discomfort during an already demanding movement. It fits both standard and Olympic bars, which makes it a practical addition to any gym setup.

    How to Increase Your Bench Press

    Once your bench press form is solid, the next question is always: how do I add weight? Here’s what actually works.

    Progressive Overload

    If you’re a beginner or early intermediate, you should be adding 2.5 to 5 pounds to the bar every week or every other week. This is the most evidence-backed principle in strength training. Don’t add weight until you can complete all prescribed reps with clean form — but once you can, add the weight. Small plates (1.25 lb) are your best friend here.

    Strengthen Your Triceps

    The triceps are the primary mover in the top half of the bench press. If your lockout is weak, your triceps are the bottleneck. Close-grip bench press, weighted dips, and skull crushers are your best accessories for building the tricep strength that carries over directly to your competition-style bench.

    Attack Your Weak Points

    Pause reps build bottom-end strength and reinforce proper bench press form by eliminating the stretch reflex. Pin press from the bottom of the rack builds raw starting strength. Board press — pressing to a board or block on your chest — isolates the mid-to-top range. Figure out where you fail and train that range directly.

    On the topic of wrist support during heavy accessory work and max-effort pressing, I also keep a pair of Gymreapers Weightlifting Wrist Wraps (Competition Grade, 18″) on hand for my heavier sessions. These are competition-grade wraps that meet the quality standards of serious powerlifters, and the heavy-duty thumb loop makes them easy to position quickly between sets without losing tension. If you’re pushing into heavier weight territory and want a step up in wrist support, these are the ones I reach for personally.

    Final Thoughts on How to Bench Press Correctly

    Learning how to bench press with proper technique is a skill, and like any skill, it takes deliberate repetition before it becomes automatic. Start lighter than you think you need to, nail the setup every single rep, and build the habit of good form before you start chasing numbers. The lifters who bench press for decades without injury aren’t the ones who skipped the fundamentals — they’re the ones who committed to them early. Do the same, and the numbers will follow.

  • How to Deadlift With Proper Form: The Complete Technique Guide

    How to Deadlift With Proper Form: The Complete Technique Guide

    This post contains affiliate links. As an Amazon Associate, I earn from qualifying purchases at no extra cost to you.

    If I could only teach one exercise for the rest of my coaching career, it would be the deadlift — no contest. No other movement builds raw strength through the posterior chain, improves posture, and transfers directly to real-world function quite like this one. Knowing how to deadlift properly is one of the most valuable physical skills you can develop. But here’s the catch: the deadlift is also one of the most frequently butchered exercises in any gym. Poor deadlift form doesn’t just limit your progress — it puts serious stress on your lumbar spine, knees, and hips in ways that can sideline you for months. This guide walks you through every detail of setup, execution, and common mistakes so you can pull heavy and pull safely for years to come.

    Deadlift Setup: Getting Into Position

    The setup is where most lifters lose the rep before it even begins. Get this right and the lift almost takes care of itself.

    Foot Position

    Stand with your feet roughly hip-width apart — that’s narrower than most people think. Your mid-foot should be directly under the bar, which means the bar is sitting about an inch from your shins when you look down. Do not walk up and press your shins into the bar before you’ve hinged. That error forces the bar forward before the lift even starts.

    Grip

    Reach down and grip the bar just outside your knees. A double overhand grip is my default recommendation for anyone under 80–85% of their max — it builds balanced grip strength. For heavier sets, a mixed grip (one hand over, one under) adds security. Hook grip is another option for advanced lifters willing to tolerate some thumb discomfort.

    Hip Hinge — Not a Squat

    This is the single most misunderstood element of deadlift form. To get into position, push your hips back — don’t sit down. Your hips should be higher than your knees, and your shoulders slightly in front of the bar. If your hips drop too low, you’ve turned the movement into a squat, which changes the mechanics entirely and shifts the bar away from your center of mass.

    Brace and Engage

    Before you pull, take a deep diaphragmatic breath and brace your core as if you’re about to take a punch. Engage your lats by thinking “protect your armpits” or “bend the bar around your legs.” This lat engagement is critical — it keeps the bar tight to your body and prevents rounding. Your spine should be neutral, not excessively arched or rounded.

    One thing that makes an enormous difference in your setup is your footwear. Thick, cushioned running shoes create an unstable base and actually increase the distance the bar has to travel. I recommend training in flat, minimal shoes whenever possible. The MANUEKLEAR Deadlift Shoes are specifically designed for exactly this purpose. They feature a barefoot-style, zero-drop sole that puts you directly in contact with the floor �� improving your proprioception, stability, and force transfer through the lift. Most of my in-person clients have made the switch after struggling with balance in their old runners, and the difference in their setup position is immediately noticeable. The forest green colorway also happens to look sharp, which is a bonus.

    If you prefer a slip-on option that’s just as effective, the relxfeet Men’s Minimalist Barefoot Shoes are another solid pick I keep recommending. They have a wide toe box that lets your foot spread naturally under load — important for maintaining a strong, stable base — along with a zero-drop sole and lightweight construction. This is what I keep in my gym bag on travel days when I’m training in unfamiliar gyms. They pack flat, they’re versatile enough for warming up and conditioning work, and they perform exactly as a lifting shoe should during heavy pulls.

    How to Deadlift: Step-by-Step Execution

    Now that you’re set up, here’s how to deadlift through the full range of motion with control and intention.

    The Pull

    Think “push the floor away” rather than “pull the bar up.” This mental cue activates your leg drive and keeps your hips from shooting up too fast. Before the bar leaves the ground, pull the slack out of the bar first — you’ll hear a subtle clunk as the plates settle and tension builds in the bar. Then initiate the drive. Rushing this step and jerking the bar creates a shock load on your spine that serves no one.

    Bar Path and Hip/Shoulder Rise

    The bar should stay in contact with your legs the entire way up. This is non-negotiable. The moment the bar drifts away from your body, your leverage gets worse and your lower back takes on disproportionate load. Your hips and shoulders should rise at exactly the same rate — the angle of your torso stays constant until the bar passes the knee. If your hips rise faster than your shoulders, you’ve essentially turned the deadlift into a stiff-leg RDL mid-rep, which is a recipe for strain.

    Lockout and Lowering

    At the top, stand tall and squeeze your glutes hard. Do not hyperextend your lower back in an attempt to “finish” the rep — that’s unnecessary spinal loading that adds zero strength benefit. Simply stand upright, hips through, glutes contracted. To lower the bar, reverse the movement: push your hips back first, keeping the bar close to your legs, then bend your knees once the bar passes them.

    For lifters working at heavier loads, a quality lifting belt is a legitimate performance and safety tool — not a crutch. A belt gives your core something to brace against, increasing intra-abdominal pressure and protecting your spine at near-maximal efforts. The Dark Iron Fitness Genuine Leather Weightlifting Belt is one I’ve used personally and recommended to dozens of clients. It’s four inches wide, constructed from genuine leather with reinforced stitching, and uses a double prong buckle that locks in securely without the fuss of a lever. The leather stiffness gives you excellent feedback — you can really feel yourself bracing into the belt — which actually teaches better bracing mechanics over time.

    Common Deadlift Form Mistakes

    • Rounding the lower back: This is the number-one injury risk in the deadlift. It typically happens because the weight is too heavy, the lats aren’t engaged, or the lifter doesn’t brace before pulling. Fix it by lightening the load and focusing on a neutral spine before the bar moves.
    • Squatting the deadlift: When the hips drop too low, the bar is forced forward and your quads take over a movement that should be hip-dominant. Keep your hips higher than your knees in the setup — this is a hinge, not a squat.
    • Bar drifting forward: If the bar is swinging away from your body during the pull, you’re losing mechanical advantage. Engage your lats harder and think about keeping the bar “dragging” up your shins and thighs.
    • Jerking the bar off the floor: Slack must be removed from the bar before you drive. Explosively yanking at the bar creates a sudden, uneven load spike that stresses your spine and often breaks your position immediately.
    • Hyperextending at the top: Leaning back aggressively at lockout is not a sign of strength — it’s a sign of poor motor control. Stand tall, not backward. Glutes contracted, ribs down.

    If you’re training at higher intensities where a belt becomes appropriate, another excellent option worth considering is the RDX Weight Lifting Belt. What sets this one apart is the choice between 4-inch and 6-inch padded options in genuine cowhide leather, plus 10 adjustable holes that give you a very precise fit — something that matters more than most people realize when you’re bracing hard under a heavy bar. I’ve found the extra padding particularly useful for clients who are newer to belt training and find the hard edge of a standard powerlifting belt uncomfortable during the learning curve. It’s a well-built belt at a fair price point for serious recreational lifters.

    Conventional vs Sumo Deadlift: Which Is Right for You?

    The conventional deadlift — feet hip-width, hands outside the knees — is the standard starting point and works well for most body types. The sumo deadlift uses a much wider stance with the hands gripping inside the legs, which shortens the range of motion and shifts more demand onto the hips and adductors while reducing lower back stress.

    Lifters with longer torsos and shorter femurs often do well with conventional. Lifters with longer femurs or limited hip mobility frequently find sumo more comfortable and biomechanically advantageous. Neither is universally superior — both build serious strength when performed with proper deadlift form. My recommendation: learn conventional first to build foundational hip hinge mechanics, then experiment with sumo to see which feels stronger and more natural for your structure. Many competitive powerlifters have found their best numbers only after trying both over several training cycles.

    How Much Should You Deadlift? (Strength Standards)

    Knowing where you stand relative to general strength standards is useful for setting realistic goals and programming appropriately. These are rough guidelines based on bodyweight multipliers for the conventional deadlift:

    • Beginner (less than 1 year of training): 1x bodyweight
    • Novice (1–2 years): 1.5x bodyweight
    • Intermediate (2–4 years): 2x bodyweight
    • Advanced (4+ years): 2.5x bodyweight
    • Elite: 3x+ bodyweight

    These numbers should inform your training, not define your worth as a lifter. Body proportions, training history, age, and genetics all play a role. What matters most is consistent progress over time with sound mechanics. A 1.5x bodyweight deadlift with perfect form is worth far more than a 2x bodyweight pull that destroys your lower back every session.

    Final Thoughts

    Understanding how to deadlift with precision is a skill that pays dividends across every area of your training and daily life. The setup, the brace, the hip hinge, the bar path — every detail compounds into a lift that’s either building you up or gradually breaking you down. Invest the time to nail proper deadlift form before chasing numbers, choose your equipment wisely, and approach progressive overload with patience. The deadlift rewards those who respect it. Start light, move well, and build from there — your future self will thank you.

  • Gym Workout Plan for Beginners: Your First 12 Weeks

    Gym Workout Plan for Beginners: Your First 12 Weeks

    This post contains affiliate links. As an Amazon Associate, I earn from qualifying purchases at no extra cost to you.

    Walking into a gym for the first time can feel like showing up to a party where everyone else knows the dress code and you definitely don’t. The machines look complicated, the free weight area feels like it belongs to someone else, and you’re not quite sure where to start. Here’s the truth: every single person in that building had their first day. Every one of them stood exactly where you’re standing right now. The difference between people who stick with it and people who don’t usually comes down to one thing — having a plan. A solid gym workout plan for beginners removes the guesswork, gives you purpose the moment you walk through the door, and makes the whole experience about ten times less intimidating. That’s exactly what this guide is designed to give you.

    Before You Start: What Beginners Actually Need to Know

    Before we get into the workouts themselves, let’s clear up a few things that stop a lot of people from ever getting started in the first place.

    You do not need supplements, a perfect wardrobe, or some baseline level of fitness before you show up. The gym is not a reward for already being fit — it’s the tool you use to get there. A decent pair of trainers and whatever comfortable clothes you already own are genuinely all you need on day one. Nobody is checking your pre-workout brand or your leggings label.

    More importantly, your only job in the early weeks is to learn movements — not to lift heavy. Every exercise in this guide has a learning curve, and the smartest thing you can do is respect that curve. Lighter weight with good form will build more strength, prevent injury, and produce better long-term results than loading up a bar before your body knows what it’s doing. Progress in this context means moving better, not moving more weight. That shift in mindset is genuinely everything.

    And finally — nobody is watching you. I know it feels that way. But the reality of any gym is that the other members are focused almost entirely on themselves. They’re checking their own form in the mirror, thinking about their next set, or zoning out to their playlist. You have far more freedom to learn, make mistakes, and figure things out than you probably realize.

    One practical thing that genuinely helps in those early sessions: protecting your hands. When you’re learning to grip barbells, dumbbells, and cables, the skin on your palms hasn’t toughened up yet, and blisters are a real nuisance that can interrupt your training. Most of my clients start out using the HOZMOZ Ventilated Weight Lifting Gloves with Full Palm Protection & Grip & Shock Absorption. What I like about these specifically is the thick palm padding combined with the ventilated design — your hands stay comfortable and protected without overheating mid-set. They’re suitable for both men and women, and they make a real difference when you’re building up grip tolerance in those first few weeks of pulling and pressing movements.

    The 12-Week Beginner Gym Workout Plan

    This beginner workout plan is structured in three four-week phases, each one building logically on the last. You’ll start with full-body training three days a week, and by week nine you’ll be ready for a more structured upper/lower split. Rest at least one day between each training day — your body gets stronger during recovery, not during the workout itself.

    Weeks 1–4: Learn the Movements (Full Body, 3x/Week)

    Your entire focus in month one is technique. Choose weights that feel almost too easy. You should be able to complete every rep with full control and finish every set feeling like you had two or three more in you. This is deliberate — it protects you from injury and builds the neuromuscular patterns that make heavier lifting possible later.

    • Goblet Squat — 3 sets of 10 reps
    • Romanian Deadlift (dumbbells) — 3 sets of 10 reps
    • Dumbbell Bench Press — 3 sets of 10 reps
    • Cable or Dumbbell Row — 3 sets of 10 reps
    • Dumbbell Overhead Press — 3 sets of 10 reps
    • Plank — 3 sets of 20–30 seconds

    Rest 60–90 seconds between sets. Three sessions per week with a rest day in between is the ideal structure — Monday, Wednesday, Friday works well for most people.

    Weeks 5–8: Build on the Foundation (Full Body, 3x/Week)

    By now the movements should feel familiar. It’s time to add a little weight and introduce one or two new exercises. Aim to increase the load slightly every session or every other session — even small jumps matter. This phase is where you’ll start to notice real changes in how you feel and how the exercises feel.

    • Barbell or Goblet Squat — 3 sets of 8 reps
    • Romanian Deadlift (barbell or dumbbells) — 3 sets of 8 reps
    • Dumbbell or Barbell Bench Press — 3 sets of 8 reps
    • Cable Row — 3 sets of 8 reps
    • Overhead Press — 3 sets of 8 reps
    • Lat Pulldown — 3 sets of 10 reps
    • Dumbbell Lateral Raise — 3 sets of 12 reps
    • Plank or Dead Bug — 3 sets of 30 seconds

    Weeks 9–12: Upper/Lower Split (4x/Week)

    This phase adds a fourth training day and separates your sessions into upper body and lower body focus days. More volume, more frequency for each muscle group, and a structure that serious lifters use at every level. You’re ready for it by this point.

    Upper Body Day (2x/week — e.g., Monday & Thursday):

    • Barbell Bench Press — 4 sets of 6–8 reps
    • Cable Row — 4 sets of 8 reps
    • Overhead Press — 3 sets of 8 reps
    • Lat Pulldown — 3 sets of 10 reps
    • Dumbbell Lateral Raise — 3 sets of 12 reps
    • Tricep Pushdown — 3 sets of 12 reps
    • Dumbbell Curl — 3 sets of 12 reps

    Lower Body Day (2x/week — e.g., Tuesday & Friday):

    • Barbell Squat — 4 sets of 6–8 reps
    • Romanian Deadlift — 4 sets of 8 reps
    • Leg Press — 3 sets of 10 reps
    • Leg Curl — 3 sets of 12 reps
    • Calf Raise — 3 sets of 15 reps
    • Ab Wheel or Plank Variation — 3 sets

    Tracking your workouts through all three phases is one of the most underrated habits a beginner can build. Writing down your sets, reps, and weights means you always know whether you’re progressing, and it keeps you accountable to the plan. I recommend the Fitness Workout Journal for Women & Men — A5 Workout Log Book Planner for Tracking, Progress, and Achieving Your Wellness Goals. It’s compact enough to throw in a gym bag and specifically laid out for logging training sessions rather than being a generic notebook. Having a dedicated space to record your progress makes the habit stick in a way that a phone note or random scrap of paper just doesn’t.

    The 5 Exercises Every Beginner Should Master First

    These are the foundation of this entire gym workout plan for beginners — and honestly, of most effective strength programs at any level. Master these and you have a toolkit that will serve you for years.

    1. Squat

    Start with the goblet squat — hold a dumbbell or kettlebell at your chest and focus on sitting your hips back and down while keeping your chest tall. Once this feels natural, transition to a barbell back squat. The goblet variation teaches you the movement pattern with far less risk, and it’s genuinely where I start every new client regardless of their age or background.

    2. Deadlift

    Begin with the Romanian deadlift rather than a conventional deadlift. You’ll hinge at the hips, keep a slight bend in the knees, and feel a strong stretch in your hamstrings as the weight lowers. It’s a safer starting point that builds the hip hinge pattern you need before loading up a conventional pull from the floor.

    3. Bench Press

    Dumbbell pressing is an excellent starting point because it requires each side of your body to work independently, which corrects imbalances early. Once you’re comfortable, move to the barbell bench press. Focus on keeping your shoulder blades retracted and your feet flat on the floor throughout the movement.

    As you progress to heavier pressing movements in weeks five through twelve, grip comfort becomes increasingly important. This is where a well-made glove earns its place. The HOZMOZ Ventilated Weight Lifting Gloves with Full Palm Protection, Grip & Shock Absorption are what I keep in my own gym bag for heavier pressing and pulling sessions. The shock absorption padding is particularly noticeable on barbell work — it takes the edge off the pressure on your palms without reducing your sense of grip control, which matters a lot when the weights start to climb.

    4. Row

    Rows train the muscles of your back and are the essential counterpart to pressing exercises. The cable row and dumbbell single-arm row are both great beginner options. Focus on pulling your elbow back and squeezing your shoulder blade at the end of each rep rather than just yanking the weight with your arm.

    5. Overhead Press

    Pressing a weight directly overhead trains your shoulders, upper traps, and triceps while also demanding core stability. Start with dumbbells seated or standing, and ensure you’re pressing the weight in a straight vertical path. Keep your core braced and avoid flaring your ribs upward as you press.

    Alongside your gloves, keeping a structured log of your progress on these five movements is one of the most motivating things you can do. The Nextnoid Hardcover Fitness Journal Workout Planner for Men & Women — A5 Sturdy Workout Log Book to Track Gym & Home Workouts is a great option if you want something built to last. The hardcover construction means it holds up in a gym bag over months of use, which a standard notebook simply doesn’t. Being able to flip back to week one and see how far your lifts have come is genuinely one of the most satisfying experiences in training — and this journal is built for exactly that purpose.

    Common Beginner Mistakes to Avoid

    Even with the best beginner workout plan, a few common habits can quietly undermine your progress. Here’s what to watch for.

    Program Hopping

    This is the single most common thing I see derail beginners. You try a plan for two weeks, see someone else’s routine on social media, and switch. Then you switch again. Twelve weeks later you’ve done fragments of six different programs and made progress in none of them. Commit to one gym workout for beginners and follow it for the full twelve weeks. Results take time and consistency — not novelty.

    Too Much Volume Too Soon

    Soreness is not a reliable measure of a good workout. Doing twice as many sets as prescribed won’t get you results twice as fast — it’ll just leave you too sore to train the next session. The volume in this plan is calibrated to be productive without being excessive. Trust the structure.

    Skipping Warm-Ups

    Five to ten minutes of light cardio followed by a couple of warm-up sets at a lower weight before your working sets is non-negotiable. Cold muscles and joints are significantly more vulnerable to injury, and injury is the fastest way to lose months of progress. Warm-ups also improve performance — you’ll lift better with prepared muscles than without.

    Comparing Yourself to Others

    The person squatting twice your weight has been training for years. The person with the impressive physique didn’t build it in twelve weeks. Your only relevant comparison is the version of yourself from last month. This gym workout for beginners is designed to make you better than you were — and that’s the only benchmark that matters.

    Consistency Beats Perfection Every Time

    You’re not going to nail every session. Some days the weights will feel heavier than they should. Some weeks life will get in the way. That’s completely normal and it doesn’t mean the plan isn’t working. What matters is that you keep showing up. Three imperfect sessions a week, week after week, will produce dramatically better results than occasionally perfect sessions with long gaps in between. Follow this gym workout plan for beginners, track your progress, protect your hands, and give yourself the full twelve weeks. You will be genuinely surprised by what you’re capable of — and so will everyone who said the gym wasn’t for them.

  • Best Exercises for Weight Loss: A Trainer’s Honest Ranking

    Best Exercises for Weight Loss: A Trainer’s Honest Ranking

    This post contains affiliate links. As an Amazon Associate, I earn from qualifying purchases at no extra cost to you.

    Let me be direct with you upfront: if you’re exercising your way to weight loss while ignoring your diet, you’re fighting an uphill battle with both hands tied behind your back. Research consistently shows that nutrition accounts for roughly 80% of your weight loss results. You cannot out-train a bad diet. I’ve seen people spend years grinding through daily cardio sessions, stepping on the scale, and wondering why nothing is changing — and almost every time, the problem is what’s happening in the kitchen, not the gym.

    That said, the RIGHT exercises for weight loss genuinely accelerate your results, preserve lean muscle, and reshape your body in ways that dieting alone never will. Choosing the wrong exercises, on the other hand, can actually slow your progress, increase muscle loss, and leave you smaller but still soft. This guide breaks down exactly which weight loss exercises work, which ones are a waste of your time, and how to structure your week for maximum fat loss.

    Why Strength Training Beats Cardio for Long-Term Weight Loss

    The fitness industry has spent decades telling people to hop on a treadmill to lose fat. That advice is outdated and incomplete. Cardio burns calories while you’re doing it — and then largely stops. Strength training does something fundamentally different: it builds and preserves metabolically active muscle tissue, which increases the number of calories your body burns around the clock, even while you’re sitting at your desk or sleeping.

    Skeletal muscle is one of the most metabolically expensive tissues in your body. A pound of muscle burns roughly 6–10 calories per day at rest, compared to roughly 2 calories per day for a pound of fat. That difference compounds significantly as you add lean mass over months and years. This is why two people can weigh exactly the same but have vastly different resting metabolic rates — muscle mass is the key variable.

    There’s also the afterburn effect to consider, formally known as Excess Post-exercise Oxygen Consumption (EPOC). After an intense resistance training session, your body continues burning elevated calories for 24 to 48 hours as it repairs muscle fibers, replenishes glycogen stores, and restores hormonal balance. Multiple studies, including research published in the European Journal of Applied Physiology, have confirmed that resistance training produces a significantly greater EPOC response than steady-state cardio. A 45-minute lifting session doesn’t just burn calories for 45 minutes — it keeps your metabolism elevated well into the next day.

    The Best Exercises for Weight Loss (Ranked)

    Not all exercises are created equal when fat loss is the goal. Here’s how I rank them based on calorie expenditure, muscle recruitment, hormonal response, and metabolic impact.

    Tier 1: Compound Barbell Lifts

    These are the best exercises for weight loss, full stop. Squats, deadlifts, bench press, and barbell rows recruit the largest muscle groups in your body simultaneously, triggering a significant hormonal response — particularly testosterone and growth hormone — that directly supports fat burning and muscle retention. A heavy set of deadlifts taxes your quads, hamstrings, glutes, back, core, and grip all at once. No isolation exercise comes close to that level of systemic demand. If you’re not building your program around these movements, you’re leaving results on the table.

    Tier 2: HIIT — Sprints, Battle Ropes, and Kettlebell Swings

    High-Intensity Interval Training earns its reputation as one of the most effective exercises for weight loss, particularly for those who want cardiovascular conditioning alongside fat burning. Sprints, battle ropes, and kettlebell swings done in interval format produce a substantial EPOC effect similar to resistance training, and they’re brutally efficient — 20 minutes of real HIIT delivers more metabolic impact than 45 minutes of moderate-paced jogging. Jump rope training absolutely belongs in this tier as well. It’s high-intensity, full-body, and burns a serious number of calories in a short window.

    For jump rope training, I keep the Redify Weighted Jump Rope for Workout Fitness (1LB) in my gym bag. The added weight — thanks to the 9MM fabric cotton and solid PVC rope combination — increases upper body and core activation compared to a standard rope, which means more calories burned per session. The aluminum handle and tangle-free ball bearing system make it genuinely enjoyable to use, and the adjustable length means it fits virtually anyone. If you’re doing HIIT circuits, this rope adds real resistance to what most people treat as a warm-up tool.

    If you prefer a lighter, faster option for pure speed work, most of my clients train with the Jump Rope with Tangle-Free Rapid Speed Cable and Ball Bearings. The steel cable and precision ball bearings make double-unders and rapid skipping intervals significantly easier to sustain, and the foam handles reduce grip fatigue during longer HIIT sets. It’s adjustable for men, women, and kids, so it works across the board. Speed-focused jump rope intervals are among the most underrated weight loss exercises in any training program.

    Tier 3: Low-Intensity Steady State (LISS)

    Walking, cycling, and swimming at a comfortable pace aren’t glamorous, but they’re genuinely useful for weight loss when used correctly. LISS primarily burns fat as fuel (rather than glycogen), is easy to recover from, and doesn’t interfere with your strength training adaptations the way excessive high-intensity cardio can. I recommend daily walking as a non-negotiable habit — 7,000 to 10,000 steps per day adds meaningful calorie expenditure without stressing your body’s recovery capacity.

    Monitoring your heart rate during LISS work is more important than most people realize. Staying in the right intensity zone — roughly 60–70% of your maximum heart rate — ensures you’re burning fat efficiently without accidentally pushing into a zone that depletes glycogen and increases cortisol. I personally use the Polar H10 Heart Rate Monitor Chest Strap for this. It connects via both ANT+ and Bluetooth, it’s fully waterproof (which matters if you’re swimming or sweating heavily), and it’s consistently rated as one of the most accurate consumer heart rate monitors available. Knowing your actual heart rate — not a wrist sensor estimate — takes the guesswork out of every cardio session.

    Tier 4: Isolation Exercises

    Bicep curls, tricep pushdowns, and leg extensions have their place in a well-rounded program, but they rank last among weight loss exercises in terms of calorie burn and metabolic impact. They recruit small, single muscle groups and produce minimal hormonal or metabolic response compared to compound movements. Use them as accessory work after your main lifts — don’t build your fat loss program around them.

    A Weekly Exercise Plan for Weight Loss

    Here’s the template I use with clients whose primary goal is fat loss while preserving or building muscle. It’s built around three strength days, two cardio days, and daily walking.

    • Monday: Full-body strength training — squats, deadlifts, bench press, barbell rows (45–60 minutes)
    • Tuesday: HIIT — 20-minute jump rope intervals or sprint session + 30-minute walk
    • Wednesday: Full-body strength training — Romanian deadlifts, overhead press, pull-ups, dumbbell rows (45–60 minutes)
    • Thursday: LISS cardio — 40-minute walk, bike ride, or easy swim
    • Friday: Full-body strength training — front squats, trap bar deadlifts, dips, cable rows (45–60 minutes)
    • Saturday: Active recovery — long walk, light yoga, or recreational activity
    • Sunday: Rest + daily step goal (7,000–10,000 steps minimum)

    Tracking your heart rate across all of these sessions — strength, HIIT, and LISS alike — gives you data that makes your training dramatically more effective. For serious tracking, I recommend the Garmin HRM 600 Premium Heart Rate Monitor. What sets it apart from basic chest straps is its built-in running dynamics metrics, standalone activity recording (no phone or watch required), and highly accurate HRV data. If you want to understand how hard you’re actually working and how well you’re recovering, this is the tool for it. Knowing whether you’re overtraining or undertraining each week is one of the most undervalued variables in a fat loss program.

    Exercises to Avoid If Weight Loss Is Your Goal

    Knowing what not to do is just as important as knowing the best exercises for weight loss. These common approaches consistently produce disappointing results.

    • Hours of daily steady-state cardio: Running for 90 minutes every day is one of the most counterproductive things you can do for fat loss long-term. Your body adapts rapidly by becoming more fuel-efficient — burning fewer calories for the same distance over time. Chronic excessive cardio also elevates cortisol, which actively promotes muscle breakdown and fat storage, particularly around the midsection.
    • Exclusively doing ab exercises: There is no such thing as spot reduction. A thousand crunches will not burn the fat covering your abs. Ab exercises strengthen your core, which is valuable, but they contribute almost nothing to overall calorie burn or fat loss. Your abs are revealed in the kitchen, not on the floor of your gym.
    • Machine-only routines: Resistance machines are not inherently bad, but they require significantly less stabilizer muscle activation than free weights, which means less total muscle recruited and fewer calories burned per exercise. A barbell squat burns substantially more calories than a leg press. If machines are your entire program, you’re missing a large portion of the metabolic benefit that makes strength training so effective for fat loss.

    Final Thoughts

    The right exercises for weight loss work by building metabolically active muscle, creating a sustained afterburn effect, and keeping your calorie expenditure elevated across the entire week — not just during your workout. Lead with heavy compound lifts, use HIIT strategically for conditioning, walk every single day, and stop wasting hours on chronic cardio that your body will simply adapt around. Combine this approach with a solid nutrition strategy and you will lose fat faster, look better, and actually keep the results long-term. That’s the evidence-based approach — and it’s the only one worth following.

  • How to Lose Belly Fat: What the Research Says About Targeted Fat Loss

    How to Lose Belly Fat: What the Research Says About Targeted Fat Loss

    This post contains affiliate links. As an Amazon Associate, I earn from qualifying purchases at no extra cost to you.

    “How to lose belly fat” is the single most searched fitness phrase on the internet. Every year. Without fail. And every year, the same recycled nonsense floods the results — detox teas, fat-burning wraps, and 30-day ab challenges that promise a flat stomach by summer. Here’s the uncomfortable truth: roughly 90% of the advice out there is either misleading, oversimplified, or flat-out wrong. If you’ve tried “all the things” and your waistline hasn’t budged, it’s not your willpower. It’s the advice. This guide cuts through the noise with research-backed strategies that actually work — and explains exactly why the popular stuff doesn’t.

    The Truth About Spot Reduction (It Doesn’t Work)

    Let’s kill the biggest myth in fitness right now: you cannot choose where your body loses fat. The idea that doing crunches will burn the fat sitting over your abs — known as spot reduction — has been thoroughly debunked by research. A 2011 study published in the Journal of Strength and Conditioning Research had subjects perform seven different abdominal exercises, five days a week for six weeks. The result? No significant change in abdominal fat compared to a control group. Zero. Six weeks of daily ab work and the belly fat didn’t move.

    Fat loss is systemic, not local. When you create the conditions for fat loss, your body pulls stored fat from wherever it chooses — often influenced by genetics, hormones, and sex. Some people lose from their face first. Others from their legs. The stomach tends to be one of the last places to lean out for most people, which is frustrating but completely normal. The sooner you accept this, the sooner you stop wasting time on programs designed around the myth.

    What Actually Reduces Belly Fat

    If you’re serious about learning how to lose belly fat, these are the levers that actually matter — and none of them involve a waist trainer.

    Caloric Deficit Is Non-Negotiable

    Your Total Daily Energy Expenditure (TDEE) is the number of calories your body burns in a day accounting for your activity level. Eat below that number and you lose fat. Eat above it and you gain. There is no supplement, exercise protocol, or meal timing trick that overrides this fundamental equation. A moderate deficit of 300–500 calories per day is sustainable and produces roughly 0.5–1 lb of fat loss per week without destroying your metabolism or muscle mass.

    Tracking your food accurately is where most people fall apart — not because they lack discipline, but because they genuinely underestimate portions. Studies consistently show people underreport calorie intake by 20–40%. This is where a reliable kitchen scale becomes one of the most powerful fat loss tools you own. The Etekcity Food Kitchen Scale is what I recommend to every client starting a deficit. It measures in both grams and ounces, has a clean LCD display, and the 304 stainless steel surface is easy to wipe down. Most people are genuinely shocked when they weigh out what they thought was “one serving” of peanut butter. This scale removes the guesswork entirely.

    If you want a rechargeable option with a little more capacity, the Food Scale by RENPHO — 33lb Digital Kitchen Scale is an excellent alternative. It supports both battery and Type-C USB charging, which means you’re never scrambling for a AA battery mid-meal prep. The 304 stainless steel surface handles up to 33 lbs and reads in multiple units. I keep one of these on my counter permanently. No batteries dying mid-weigh-in, no excuses to eyeball it.

    Protein, Sleep, and Stress

    Targeting around 1 gram of protein per pound of bodyweight during a caloric deficit is one of the most well-supported strategies in sports nutrition research. High protein intake preserves lean muscle mass while you’re in a deficit, keeps you fuller longer, and has a higher thermic effect than carbs or fat — meaning your body burns more calories just digesting it. This isn’t optional if you want to lose fat, not muscle.

    Sleep and stress are the two most underrated factors in belly fat specifically. Chronic sleep deprivation elevates cortisol, a stress hormone that directly promotes visceral fat storage — the deep abdominal fat wrapped around your organs that’s associated with metabolic disease. A 2018 review in Obesity Reviews confirmed that sleep restriction increases appetite, reduces fat oxidation, and shifts fat storage to the abdominal region. You can out-train a lot of things. You cannot out-train cortisol. Aim for 7–9 hours and treat it like a training variable.

    The Best Exercises to Lose Belly Fat (Not What You Think)

    Here’s where the approach to exercises to lose belly fat gets misunderstood. The goal of exercise in this context isn’t to “target” belly fat — we’ve established that doesn’t work. The goal is to maximize caloric expenditure, preserve muscle, and improve metabolic health. With that framing, the exercise hierarchy looks very different.

    Compound Lifting Over Cardio Machines

    Heavy compound movements — squats, deadlifts, Romanian deadlifts, bench press, rows, overhead press — burn significantly more calories than isolated machine exercises and create a greater post-exercise oxygen consumption (EPOC) effect, meaning your body continues burning calories at an elevated rate for hours after the session. A 2012 study in the Journal of Strength and Conditioning Research found that resistance training produced greater long-term fat loss than aerobic training when caloric intake was controlled. Lift heavy. Lift consistently. It matters more than the treadmill.

    HIIT, Steady-State, and the Walking Secret

    HIIT and steady-state cardio both work for fat loss. The research on HIIT shows slightly superior outcomes for visceral fat reduction in shorter timeframes, but the honest answer is: the best cardio is the one you’ll actually do consistently. If you hate sprinting, you’ll skip it. If you enjoy cycling, do that. What often gets overlooked is walking. Accumulating 8,000–10,000 steps daily adds a significant non-exercise activity thermogenesis (NEAT) contribution to your deficit without spiking cortisol or interfering with recovery. Many physique athletes rely heavily on walking during cut phases for exactly this reason. It’s boring advice, but it works.

    And for the record — crunches are among the least effective exercises to lose belly fat. They burn minimal calories, offer no compound benefit, and do nothing to reduce the fat layer sitting over your abs. Use them for core endurance if you want. Just don’t use them as a fat loss strategy.

    A Simple Plan to Lose Belly Fat

    Here’s how to actually structure this. No complexity, no gimmicks.

    • Step 1 — Calculate your TDEE: Use an online TDEE calculator with your age, weight, height, and activity level. Subtract 300–500 calories to establish your daily target.
    • Step 2 — Hit your protein target: Set protein at 0.8–1g per pound of bodyweight. Use a kitchen scale to weigh protein sources accurately — especially meat, dairy, and legumes.
    • Step 3 — Strength train 3–4x per week: Focus on compound movements. Progressive overload — gradually increasing weight or reps over time — is the driver of muscle retention during a deficit.
    • Step 4 — Walk daily: Target 8,000–10,000 steps. This alone can add 300–500 calories of expenditure per day without impacting recovery.
    • Step 5 — Track progress beyond the scale: Body weight fluctuates daily due to water, food volume, and hormones. Use body composition measurements alongside scale weight.

    Tracking body fat — not just scale weight — gives you a far more accurate picture of whether you’re actually losing fat or just losing water and muscle. The Accu-Measure Fitness 3000 Body Fat Caliper is the most straightforward tool for this. It’s a single-site skinfold caliper designed for self-testing at the suprailiac site, and it’s been validated against hydrostatic weighing in independent assessments. I’ve recommended this to clients for years because it removes the ambiguity — when the scale stalls but your caliper reading drops, you know you’re making progress. Simple, affordable, and genuinely useful.

    If you want a more complete measurement toolkit, the Sequoia Trimcal 4000 Body Fat Caliper with Tape Measure adds circumference tracking alongside skinfold measurements. The dual-sided design and included tape measure let you track waist, hip, and limb measurements alongside body fat percentage — which gives you a comprehensive picture of body composition changes over time. This is what I keep in my gym bag. When someone tells me the scale hasn’t moved in two weeks, these measurements usually tell a different story.

    Realistic Timeline

    A safe, sustainable rate of fat loss is 0.5–1% of bodyweight per week. For most people, that translates to 0.5–2 lbs per week depending on starting point. Visible changes to the abdomen — especially for people carrying significant visceral fat — typically take 3–6 months of consistent effort. If someone is promising visible abs in 30 days, they are selling something. Realistic expectations are part of the plan.

    The Bottom Line on How to Lose Belly Fat

    There is no secret. Knowing how to lose belly fat comes down to a caloric deficit, adequate protein, consistent strength training, daily movement, and enough sleep to keep cortisol in check. The process to lose belly fat isn’t complicated — it’s just slower and less exciting than the fitness industry wants you to believe. Measure your food, track your body composition, lift heavy, walk more, and sleep. Do that for six months without looking for shortcuts, and you will see results. The tools exist. The research is clear. All that’s left is consistent execution.

  • Upper Body Workout: The Best Exercises for a Complete Upper Body

    Upper Body Workout: The Best Exercises for a Complete Upper Body

    This post contains affiliate links. As an Amazon Associate, I earn from qualifying purchases at no extra cost to you.

    If you’re short on training days but serious about building a strong, muscular upper body, a well-programmed upper body workout is one of the most efficient tools in your arsenal. Instead of splitting chest on Monday, back on Wednesday, and shoulders on Friday, you can hit every major upper body muscle group in a single session — saving time without sacrificing results. Research consistently shows that training frequency and total weekly volume are the primary drivers of hypertrophy and strength gains, and a smart upper body session lets you maximize both in fewer gym visits. Whether you’re training three days a week or adding this as a dedicated upper day in a push/pull/legs or upper/lower split, this guide gives you everything you need to build a complete, balanced physique from the shoulders down to the core.

    Upper Body Muscles: What You’re Training

    Before you load a barbell or grab a dumbbell, it’s worth knowing exactly what you’re targeting. A complete upper body workout isn’t just about a big chest — it’s about developing every muscle group above the waist in a balanced, functional way.

    • Chest (Pectoralis Major and Minor): The pecs are responsible for horizontal pushing and are the primary movers in pressing exercises like the bench press and dips.
    • Back (Lats, Traps, Rhomboids): Your back muscles handle all pulling movements. The lats create that wide, V-taper look, while the traps and rhomboids support posture and shoulder health.
    • Shoulders (Anterior, Lateral, and Posterior Deltoids): All three heads of the deltoid need direct work. The front delt gets hit during pressing, but the lateral and rear delts require dedicated upper body exercises to develop fully.
    • Arms (Biceps and Triceps): Your biceps are the primary elbow flexor activated during pulling movements. Your triceps — which make up roughly two-thirds of upper arm mass — are the primary elbow extensor trained during pushing.
    • Core: Your core stabilizes every compound lift in this program. Exercises like the overhead press and barbell row demand significant core bracing to execute safely and effectively.

    Push/pull balance is non-negotiable here. Overloading pushing movements without matching pulling volume is one of the most common causes of shoulder impingement and poor posture. I always program at least an equal ratio of pulling to pushing — ideally slightly more pulling — in every upper body session I write.

    The Best Upper Body Exercises

    Not all upper body exercises are created equal. The best upper body workout prioritizes compound, multi-joint movements that recruit the most muscle mass and allow for progressive overload over time. Isolation work has its place, but it should supplement — not replace — the foundational lifts.

    Push Exercises

    • Bench Press: The gold standard for chest development. Activates the pecs, anterior deltoid, and triceps simultaneously. Both flat and incline variations are supported by strong evidence for upper body hypertrophy.
    • Overhead Press: The most complete shoulder builder in existence. When performed standing, it also demands full-body stability and core activation.
    • Dips: An underrated compound movement that hammers the lower chest and triceps through a deep range of motion. Use bodyweight or add load via a dip belt for progressive overload.

    Pull Exercises

    • Pull-Ups and Rows: Pull-ups are one of the most effective lat and bicep builders available — no machine required. Barbell and dumbbell rows target the entire posterior chain of the upper back, including the traps, rhomboids, and lats.
    • Face Pulls: Often overlooked, face pulls are critical for rear delt development and rotator cuff health. I include them in almost every upper body program I write for clients.

    If pull-ups are a cornerstone of your training — and they should be — you need equipment that keeps up with you at home. The ALLY PEAKS Pull Up Bar Thickened Steel Pipe Super Heavy Duty Steel Frame Upper Workout Bar (silver2) is one of the best doorway pull-up bars I’ve come across for home training. What sets it apart is the thickened steel pipe construction and multi-grip design, which lets you target your lats, biceps, and rear delts from multiple angles without needing a full cable machine setup. I’ve recommended this to clients who want to bring serious pull-up training home without bolting anything permanently into their walls.

    The Complete Upper Body Workout

    Here’s the full upper body workout I program for intermediate lifters looking to build strength and size simultaneously. This routine is built around a push/pull structure with a 4:3 compound-to-isolation ratio. Rest 2–3 minutes between compound sets and 60–90 seconds between isolation sets.

    • Bench Press — 4 sets x 6–8 reps: Use a weight that challenges you by rep 6 while keeping form tight. Control the descent for 2–3 seconds, then press explosively.
    • Barbell Row — 4 sets x 6–8 reps: Hinge at the hips to roughly 45 degrees, pull the bar to your lower chest, and squeeze the shoulder blades hard at the top. This is the most important pull in the program.
    • Overhead Press — 3 sets x 8–10 reps: Standing or seated, press the bar directly overhead, locking out fully at the top. Brace your core throughout — don’t let your lower back hyperextend.
    • Pull-Ups — 3 sets x AMRAP (As Many Reps As Possible): Use full range of motion — dead hang to chin over bar. If bodyweight is too easy, add a weight belt. If it’s too hard, use a resistance band for assistance.
    • Dumbbell Lateral Raises — 3 sets x 12–15 reps: Isolate the lateral deltoid by keeping a slight elbow bend and raising to just below shoulder height. Don’t swing or shrug — this is a control exercise.
    • Tricep/Bicep Superset — 2 sets x 12 reps each: Pair a tricep pushdown or overhead extension with a dumbbell curl. Supersetting arms at the end of the session is time-efficient and drives a significant pump to finish.

    For the pull-up sets in this program, the ALLY PEAKS Pull Up Bar Thickened Steel Pipe Super Heavy Duty Steel Frame Upper Workout Bar with a Max Limit of 440 lbs is the version I’d point heavier lifters and more advanced trainees toward. That 440 lb weight limit gives serious athletes room to add a weighted vest or belt without any concern about the bar’s integrity. The heavy-duty steel frame is built to handle high-rep sets day after day, which is exactly what a program like this demands. If you’re committed to pull-ups as a long-term training staple, this is the bar worth investing in.

    Upper Body Workout at Home With Dumbbells

    No barbell? No problem. A dumbbell-only upper body workout can be just as effective for building strength and muscle, especially when you’re using a quality adjustable set that gives you access to a full range of loads. Here’s a complete home-friendly routine built entirely around dumbbells.

    • Dumbbell Bench Press — 4 sets x 8–10 reps: Greater range of motion than a barbell and easier on the wrists. Use a flat bench, a stability ball, or even the floor for a floor press variation.
    • Dumbbell Row — 4 sets x 10–12 reps per side: Support one hand and knee on a bench, row the dumbbell to your hip, and hold for a brief squeeze at the top.
    • Dumbbell Overhead Press — 3 sets x 10–12 reps: Press both dumbbells simultaneously from shoulder height overhead. A neutral grip option reduces shoulder stress for those with impingement issues.
    • Dumbbell Lateral Raises — 3 sets x 15 reps: Keep these light and controlled. Lateral raises are one of the few upper body exercises where going heavy actually reduces stimulus on the target muscle.
    • Dumbbell Bicep Curl — 3 sets x 12 reps: Alternate arms or curl simultaneously. Supinate the wrist at the top to maximize bicep activation.
    • Dumbbell Tricep Kickback or Overhead Extension — 3 sets x 12 reps: Both target the long head of the tricep effectively. The overhead extension stretches the long head under load, which research suggests may enhance hypertrophy.

    The limiting factor for most people doing dumbbell-based upper body exercises at home is having enough weight variety without filling a room with fixed dumbbells. The TYZDMY Adjustable Dumbbells Set of 2, offering up to 52.5 lbs per dumbbell (105 lbs total) with 15 weight settings is a genuinely impressive option for this kind of full-spectrum training. What I like about this set is the fast dial-select system that lets you switch weights between exercises in seconds — critical when you’re supersetting curls and extensions back to back. Several of my home-training clients have moved to this set and immediately noticed how much easier it made progressive overload without cluttering their space.

    If you want a premium alternative with a proven track record, the BowFlex Results Series 552 SelectTech Dumbbells (Pair) remain one of the most well-engineered adjustable dumbbell systems on the market. The SelectTech dial mechanism replaces 15 sets of weights in one compact footprint, and the weight increments are precise enough to support real progressive overload across all the upper body exercises in this guide — from light lateral raises at 5 lbs all the way to heavy rows and presses at 52.5 lbs. This is the set I’d invest in if I were building a long-term home gym and wanted something that holds up to daily use for years.

    Final Thoughts

    A well-structured upper body workout hits every major muscle group above the waist, balances pushing and pulling volume, and leaves room for progressive overload over time. Whether you’re training in a fully equipped gym or working through the dumbbell-only home routine, the principles are the same: lead with compound movements, maintain push/pull balance, control your tempo, and add load consistently. The best upper body workout isn’t the most complicated one — it’s the one you execute with focus and repeat with intention week after week. Use this guide as your foundation, trust the process, and the results will follow.

  • Leg Day Workout: The Complete Lower Body Training Guide

    Leg Day Workout: The Complete Lower Body Training Guide

    This post contains affiliate links. As an Amazon Associate, I earn from qualifying purchases at no extra cost to you.

    Let’s be honest — leg day gets skipped more than any other training session. People dread it, they find excuses, and they quietly convince themselves that upper body work is “enough.” I’ve heard every justification in the book. But here’s what the research actually shows: skipping your leg workout is one of the most counterproductive things you can do for your overall fitness. Heavy compound leg exercises trigger a significant hormonal response, elevating testosterone and growth hormone levels that benefit your entire body — not just your lower half. Studies have consistently shown that lower body training contributes to greater systemic anabolic output than upper body training alone. Beyond hormones, training your legs improves athletic performance across virtually every sport and physical activity, and it’s one of the most powerful things you can do for long-term knee, hip, and lower back health. If you’re not prioritizing a structured leg workout at least once or twice a week, you’re leaving gains on the table and increasing your injury risk. Let’s fix that.

    The Best Leg Exercises

    Not all leg exercises are created equal. The ones I program for myself and my clients are chosen based on their ability to load the target muscle group effectively, their transferability to real-world movement, and the evidence behind them. Here’s a breakdown by muscle group.

    Quads

    • Back Squat: The king of quad development. Loads the entire lower body under heavy tension through a full range of motion.
    • Front Squat: Shifts more demand onto the quads and upper back. Excellent for developing quad thickness and improving squat mechanics.
    • Leg Press: A machine-based option that allows high volume loading with less spinal compression — great as a secondary quad movement.
    • Leg Extensions: An isolation exercise that trains the quads through terminal knee extension. Research supports its use for VMO development and knee health when programmed correctly.
    • Lunges: A unilateral movement that corrects side-to-side imbalances and challenges stability alongside raw strength.

    If you’re squatting heavy — and you should be — knee support matters. I personally recommend the Gymreapers Knee Sleeves (1 Pair) with Gym Bag – IPF Approved for anyone pushing serious weight on squats. These 7MM neoprene sleeves provide genuine compressive support that keeps the knee joint warm and tracking properly under load. The fact that they’re IPF approved tells you they’re built to a standard that competitive powerlifters actually trust. I keep a pair in my bag on every leg day, and most of my clients who squat over 225 lbs have switched to these and haven’t looked back.

    Hamstrings

    • Romanian Deadlifts (RDLs): The most effective hamstring exercise for developing length and strength simultaneously. Trains the hamstrings in a lengthened position, which research links to greater hypertrophy.
    • Lying Leg Curls: A direct hamstring isolation movement. Pairs well with RDLs to cover both hip-dominant and knee-flexion-based hamstring function.
    • Nordic Curls: One of the most challenging and effective hamstring exercises available. Strong evidence supports their use for hamstring injury prevention in athletes.

    Glutes

    • Hip Thrusts: Unmatched for glute activation. EMG research consistently shows higher glute activation during hip thrusts than during squats.
    • Bulgarian Split Squats: A brutal unilateral movement that hammers the glutes and quads simultaneously while improving hip mobility and single-leg stability.

    Calves

    • Standing Calf Raises: Targets the gastrocnemius, the larger, more visible calf muscle. Best performed through a full range of motion with a controlled tempo.
    • Seated Calf Raises: Specifically targets the soleus, which sits beneath the gastrocnemius. Often neglected, but essential for complete calf development.

    Footwear is often overlooked in leg training, but it makes a real difference — especially for squats and deadlifts. I’ve been recommending the Osterland Weightlifting Shoes to clients who struggle with heel lift or forward lean during squats. The elevated heel position built into these shoes improves squat depth and keeps your torso more upright, which means better quad activation and safer mechanics under heavy load. These are purpose-built for exactly the kind of leg exercises we’re talking about here, and the quality you get for the price is genuinely impressive.

    The Complete Leg Day Workout

    This is the leg day workout I come back to again and again when I want a session that hits everything — quads, hamstrings, glutes, and calves — with the right balance of intensity and volume. It’s built around compound movements first, with accessory work to fill in the gaps. Rest 2-3 minutes between sets on the heavier compound lifts, and 60-90 seconds on the accessory exercises.

    • Back Squats: 4 sets × 6-8 reps
    • Romanian Deadlifts: 3 sets × 8-10 reps
    • Leg Press: 3 sets × 10-12 reps
    • Walking Lunges: 3 sets × 12 reps each leg
    • Lying Leg Curls: 3 sets × 12 reps
    • Standing Calf Raises: 4 sets × 12-15 reps

    The structure here is intentional. You’re squatting first when your central nervous system is freshest and your energy reserves are highest. RDLs follow because they’re technically demanding but don’t compete with the squat pattern. The leg press gives your quads additional volume without adding more spinal loading. Walking lunges address any imbalances while also building functional unilateral strength. Leg curls close out the hamstring work, and calf raises finish everything off. This is a complete, evidence-based leg workout that delivers results when you execute it with genuine effort.

    For deadlift-heavy sessions like this one, having the right shoe matters just as much as it does for squatting. The MANUEKLEAR Strong Anti-Slip Deadlift Lifting Squat Shoes are a solid choice if you want one pair of shoes that handles both movements well. The rubber non-slip sole keeps you rooted to the floor during heavy pulls, which is exactly what you need when you’re grinding through Romanian deadlifts at the end of a tough session. I’ve had clients who were slipping in regular running shoes switch to these and immediately report better stability and more confidence under load. That’s not a small thing when the bar is heavy.

    Quad-Dominant vs Hamstring-Dominant Leg Days

    If you’re training lower body twice per week — which I strongly recommend for most intermediate and advanced lifters — the smartest approach is to split your sessions by emphasis rather than trying to max out everything twice. This allows for better recovery, higher quality volume, and more targeted development.

    Quad-dominant leg day should anchor around back squats or front squats, followed by leg press, leg extensions, and walking lunges. This session will be harder on your knees and anterior chain, so it’s worth having your knee sleeves on hand. Keep rep ranges moderate to heavy (6-12 reps) and prioritize depth and control.

    Hamstring-dominant leg day should lead with Romanian deadlifts or a deadlift variation, followed by lying leg curls, Nordic curls, hip thrusts, and Bulgarian split squats. This session hammers the posterior chain and glutes. Rep ranges here can go slightly higher (8-15 reps) since the posterior chain often responds well to additional volume.

    Both sessions should include some calf work at the end — calves are easy to under-train when you’re focused on the bigger muscle groups. Alternating between standing and seated calf raises across your two weekly leg workouts ensures you’re hitting both the gastrocnemius and soleus consistently.

    On your heavier quad-focused days especially, knee compression support becomes important for session longevity. The Jupiter Knee Sleeves (1 Pair), 7mm Compression Knee Braces are another option I recommend to lifters who want reliable joint support without spending a fortune. The 7mm compression is the same thickness used by competitive powerlifters, and these sleeves hold up well across repeated heavy sessions. If you’re squatting twice a week with serious intent, having a quality pair of knee sleeves isn’t optional — it’s part of training smart.

    Leg Workout at Home Without Equipment

    No gym? No problem. A bodyweight leg workout done with intensity and progressive overload principles can still drive significant adaptation — especially for beginners and intermediate trainees. The key is choosing movements that are genuinely challenging and progressing them over time.

    • Pistol Squat Progressions: Start with assisted pistol squats using a doorframe or TRX strap, then progress to box pistols (sitting back to a low surface), and eventually full pistol squats. This movement demands single-leg strength, balance, and mobility simultaneously.
    • Jump Squats: A power-based variation that trains the fast-twitch muscle fibers in your quads and glutes. Perform 3-4 sets of 10-15 explosive reps with a soft landing and immediate re-engagement at the bottom.
    • Single-Leg Deadlifts: Trains the hamstrings and glutes unilaterally while building balance and hip stability. Hold a water jug or backpack for added resistance as you get stronger.
    • Wall Sits: An isometric quad exercise that’s deceptively difficult when held for 45-90 seconds. Add a tempo component or pulse at the bottom to increase difficulty without equipment.

    Structure your home leg workout the same way you would a gym session — hardest movements first, then accessory work. A sample home leg workout might look like: pistol squat progressions (4 sets), jump squats (3 sets), single-leg deadlifts (3 sets each side), and wall sits (3 rounds). That’s a complete, challenging leg workout that requires zero equipment and zero excuses.

    Final Thoughts

    A well-designed leg workout isn’t just about aesthetics — it’s about building a body that performs, stays healthy, and continues to make progress year over year. Whether you’re following the complete leg day workout outlined above, splitting into quad and hamstring sessions, or training at home with bodyweight progressions, the most important thing is consistency and progressive overload. Show up, track your numbers, add weight or reps over time, and respect the recovery process. Your legs are the foundation of your athleticism. Train them like it.

  • Full Body Workout Routine: The Most Efficient Way to Build Muscle

    Full Body Workout Routine: The Most Efficient Way to Build Muscle

    This post contains affiliate links. As an Amazon Associate, I earn from qualifying purchases at no extra cost to you.

    If you’re still running a chest-on-Monday, back-on-Tuesday, legs-on-Friday bro split, I want you to stop and ask yourself one question: how’s that actually working for you? For most people — busy professionals, parents, anyone juggling a real life outside the gym — the answer is “not as well as I’d like.” A well-structured full body workout performed three days per week is, for the vast majority of lifters, a more effective and more efficient path to building muscle and strength. I’ve trained hundreds of clients, and the shift to full body training is one of the highest-leverage changes I recommend. This guide covers the science, gives you a complete full body workout routine, and shows you how to progress so you’re actually getting stronger month after month.

    Why Full Body Workouts Build More Muscle

    The core argument against bro splits is rooted in training frequency. When you train chest once per week on a traditional split, you stimulate muscle protein synthesis once — and that elevated synthesis window largely closes within 48–72 hours. The rest of the week, that muscle group is sitting idle. A full body workout approach changes that equation completely by hitting each muscle group three times per week.

    A 2016 meta-analysis published in the Journal of Strength and Conditioning Research by Schoenfeld, Ogborn, and Krieger found that training a muscle group twice or three times per week produced significantly greater hypertrophy compared to once per week, even when total volume was equated. In other words, frequency itself is a driver of muscle growth, not just how much total work you do. Spreading your sets across three sessions rather than cramming them into one creates more frequent protein synthesis spikes, and more spikes mean more cumulative growth over time.

    There’s also a practical efficiency argument. If you’re working out three days per week and hitting every muscle group each session, you never have a “wasted” workout. Miss your leg day on a traditional split? You’ve gone two weeks without training legs. Miss a Wednesday on a full body plan? You’re back at it Friday. The redundancy built into a full body workout schedule acts as a buffer against real-life disruption.

    The Full Body Workout Routine (3 Days Per Week)

    This full body workout routine uses an A/B alternating template across Monday, Wednesday, and Friday. Week one looks like A/B/A, week two looks like B/A/B, and so on. This gives you slightly more frequency on alternating lifts without overloading any single movement pattern. Both days train the full body — they just use different exercises to provide variety, manage fatigue, and develop more complete musculature.

    Day A

    • Barbell Back Squat — 4 sets x 6 reps
    • Barbell Bench Press — 3 sets x 8 reps
    • Barbell Row — 3 sets x 8 reps
    • Overhead Press — 3 sets x 10 reps
    • Bicep Curls — 2 sets x 12 reps

    Day B

    • Deadlift — 3 sets x 5 reps
    • Incline Dumbbell Press — 3 sets x 10 reps
    • Pull-ups — 3 sets x AMRAP (as many reps as possible)
    • Leg Press — 3 sets x 12 reps
    • Tricep Pushdowns — 2 sets x 12 reps

    To execute this full body workout plan properly at home, you need a rack that can handle heavy squats, bench press, overhead press, and pull-ups without compromise. The ULTRA FUEGO Power Cage Multi-Functional Power Rack with J-Hooks, Dip Handles, Landmine Attachment and Optional Cable Pulley System covers every exercise in this program and then some. What I appreciate most about this rack is the landmine attachment — it opens up rotational pressing and rowing variations that a basic squat stand simply can’t offer. The dip handles mean your tricep work doesn’t require a separate station, and the optional cable pulley system brings the pushdowns and cable rows from Day B into your home gym without needing a commercial cable machine. If you’re serious about running this program long-term, this is the rack I’d put in my own garage.

    For lifters who want more cable variety — particularly for the pull-down and crossover movements that complement a full body workout — the GOIMU DP01 Power Cage 2000LBS Squat Rack with Cable Crossover and Dual Independent Pulley System is a serious upgrade worth considering. The dual independent pulley system is the standout feature here — it lets you perform cable crossovers, independent cable rows, and unilateral cable work that a single-stack system simply can’t replicate. A 2000 lb weight capacity means you’ll never outgrow it no matter how strong you get. Most of my more advanced clients who train at home end up in a rack like this eventually, and the GOIMU DP01 punches well above its price point for what it delivers.

    Of course, neither rack does much without quality plates and a solid barbell. For beginners and intermediate lifters building their home gym around this program, the CAP Barbell 160 lb Economy Olympic Weight Set with 7ft Chrome Barbell and Black Bumper Plates with Color Logo is an excellent starting point. The bumper plates are the key detail here — they protect your floors on deadlifts and allow you to drop the bar safely if you miss a lift, which matters when you’re training alone at home. A 160 lb total capacity is plenty of iron to run Day A and Day B as a beginner, covering squats, presses, rows, and deadlifts through the early months of linear progression.

    How to Progress on a Full Body Program

    The program above is only as good as the progression model driving it. Exercises don’t build muscle — progressive overload does. Here’s how I structure progression depending on training age.

    Beginners: Linear Progression

    If you’ve been lifting consistently for less than a year, you’re in the most privileged position in all of strength training: you can add weight to the bar every single session. Add 5 lbs per session on upper body lifts and 10 lbs per session on lower body lifts. It sounds aggressive, but your nervous system adapts faster than your muscles at this stage, and failing to push load progression is the single biggest mistake beginners make. Track every session in a notebook or app, and do not skip planned weight increases unless you genuinely failed to complete your reps.

    Intermediates: Double Progression

    Once linear progression stalls — you can’t add weight every session anymore — shift to double progression. This means you work within a rep range rather than a fixed rep target. Take bench press at 3×8 as an example: start at the bottom of the range (say, 3×6) and work up over multiple sessions until you hit 3×8 with clean form. Only then do you add 5 lbs and drop back to 3×6. This slower ramp allows you to accumulate more volume before jumping weight, which is appropriate once you’re no longer a rapid responder to every new stimulus.

    Deloads Every 4–6 Weeks

    Every 4–6 weeks, take a deload week. Drop your working weights by 40–50% and reduce volume by half. This isn’t optional softness — it’s a deliberate tool for managing accumulated fatigue and allowing connective tissue to recover. Research consistently shows that supercompensation — the performance rebound after a period of reduced training — produces strength and size gains that wouldn’t occur without the recovery phase. Come back after your deload and you’ll almost always hit new personal records.

    As your strength grows and you’re regularly deadlifting and squatting at heavier loads, your starting weight set may no longer be sufficient. The CAP Barbell 260 LB Economy Olympic Bumper Plate Set with Color Logo in Black gives you the iron to train at intermediate and advanced loads without compromising on plate quality. The bumper construction remains intact for deadlift drops, and 260 lbs of total capacity means you’re equipped for heavy squats, deadlifts, and loaded presses well into your intermediate training career. This is the set I’d recommend upgrading to once you’ve outgrown a starter kit — it’s straightforward, durable, and gives you room to grow.

    Full Body Workout at Home

    No barbell? No problem. A full body workout at home is completely viable with bodyweight and a pair of adjustable dumbbells. Here’s how to adapt the same structure:

    Home Day A

    • Goblet Squat or Bulgarian Split Squat — 4 sets x 8–10 reps
    • Dumbbell Floor Press or Push-ups (weighted vest) — 3 sets x 10–12 reps
    • Dumbbell Row — 3 sets x 10 reps each side
    • Dumbbell Overhead Press — 3 sets x 10–12 reps
    • Dumbbell Curl — 2 sets x 12–15 reps

    Home Day B

    • Romanian Deadlift (dumbbells) — 3 sets x 10–12 reps
    • Incline Push-ups or Dumbbell Incline Press — 3 sets x 10–12 reps
    • Pull-ups or Inverted Rows — 3 sets x AMRAP
    • Dumbbell Reverse Lunge — 3 sets x 10 reps each leg
    • Overhead Tricep Extension (dumbbell) — 2 sets x 12–15 reps

    The same progression principles apply here. Add reps until you hit the top of your rep range, then increase dumbbell weight. The home version is genuinely effective — I’ve seen clients build significant muscle training exclusively this way for months before transitioning to a barbell setup.

    Final Thoughts

    A well-programmed full body workout three days per week is not a compromise — it’s a smart, evidence-based training strategy that outperforms low-frequency splits for the majority of natural lifters. You’re hitting every muscle group more often, stimulating protein synthesis more frequently, and building in structural redundancy that keeps progress moving even when life gets in the way. Whether you’re training in a commercial gym, building a home setup around one of the power racks above, or working with nothing but dumbbells and your bodyweight, the framework in this guide will get you stronger. Run this full body workout routine, track your progress, add weight consistently, and deload when scheduled. That’s the whole system — and it works.