Tag: compound lifts

  • How to Squat Properly: The Definitive Barbell Squat Guide

    How to Squat Properly: The Definitive Barbell Squat Guide

    This post contains affiliate links. As an Amazon Associate, I earn from qualifying purchases at no extra cost to you.

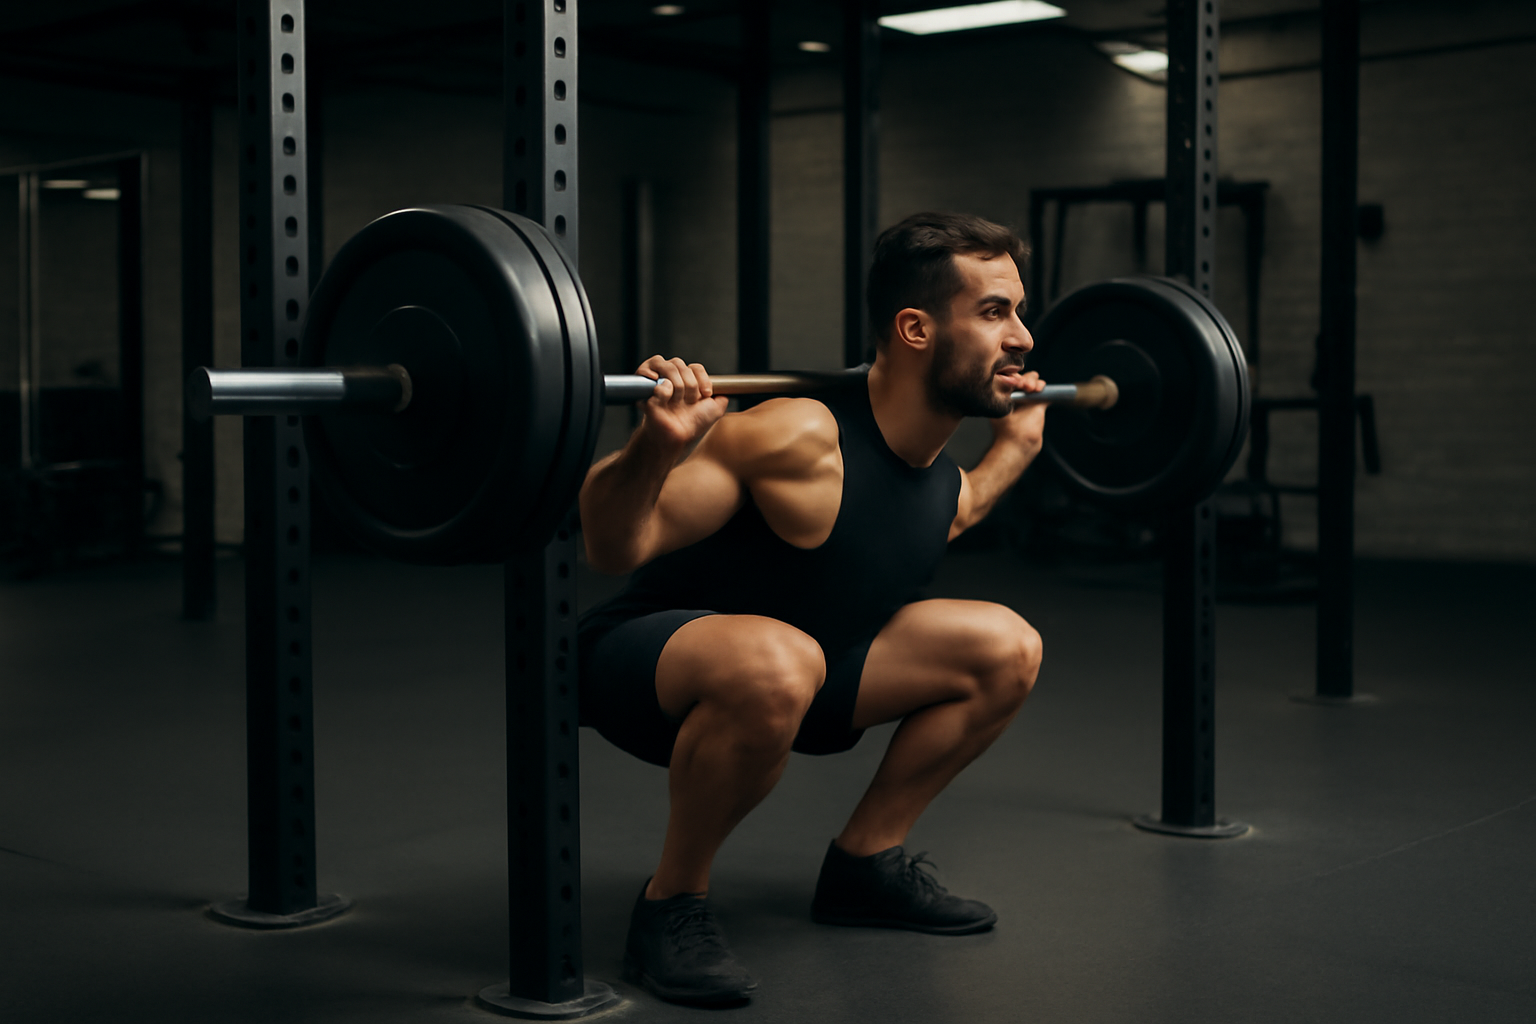
    If I had to pick one exercise that every lifter — beginner or advanced — needs to master, it’s the squat. It builds more total muscle mass, demands more full-body coordination, and transfers to more real-world movement patterns than almost anything else you can do under a barbell. But here’s the catch: the squat is also the most technique-dependent lift in the gym. Done well, it’s transformative. Done poorly, it’s a fast track to knee pain, lower back strain, and wasted training. That’s why learning how to squat correctly from the start isn’t optional — it’s the whole game. In this guide, I’m going to walk you through every element of squat form so you can train heavier, move better, and stay injury-free for the long haul.

    Squat Setup: Bar Position, Stance, and Grip

    Before you touch the bar, you need a plan. The decisions you make during setup determine everything that happens on the way down and back up.

    High Bar vs. Low Bar

    High bar positioning places the barbell across the upper traps, just below the base of the neck. It produces a more upright torso and is the go-to for Olympic lifters, athletes, and most general fitness trainees. Low bar positioning sits the bar two to three inches lower, across the rear deltoids, which shifts the torso forward and allows more weight to be moved — making it the preferred setup for most powerlifters. Neither is universally superior. If you’re training for athletic performance or body composition, start with high bar. If your primary goal is maximal strength and competition, low bar is worth learning.

    Stance Width and Foot Angle

    Stance width is not one-size-fits-all — it’s anatomy-dependent. A shoulder-width stance works well for most people, but lifters with wider hips or deeper hip sockets often squat better with a slightly wider stance. Experiment within a range of shoulder-width to just outside shoulder-width. As for foot angle, point your toes out somewhere between 15 and 30 degrees. This toe-out position matches the natural angle of your femurs and allows your knees to track directly over your toes throughout the movement. Forcing your feet straight forward is a common mistake that restricts depth and puts unnecessary stress on the knee joint.

    Grip and Wrist Position

    Your grip width should be just wide enough to allow your elbows to drive down and back without shoulder discomfort. A thumbless or “suicide” grip is common among experienced lifters, but a full grip works perfectly fine. The critical point is wrist position: do not let your wrists bend back under the bar. Keep them neutral and straight. Bent wrists under load lead to forearm and elbow pain over time. If achieving this position is difficult, widen your grip slightly and work on shoulder and thoracic mobility.

    How to Squat: Step-by-Step Execution

    The Walkout

    Unrack the bar by taking it out in no more than two to three steps. Step back with one foot, bring the other foot to your squat stance, and make one final micro-adjustment if needed. That’s it. Every extra step you take is wasted energy and an opportunity to lose your setup. Once you’re in position, don’t drift forward or shuffle around — own your stance before you descend.

    Bracing

    Before every single rep, take a deep diaphragmatic breath — breathe into your belly, not your chest — and brace your entire core as hard as you can, as if you’re about to take a punch to the stomach. This intra-abdominal pressure creates a rigid column of support for your spine. Don’t just breathe in; brace outward in all directions. This is the Valsalva maneuver, and it is non-negotiable for safe, strong squatting under load.

    The Descent

    Initiate the squat by breaking at the hips and knees simultaneously — not by pushing the knees forward first, and not by hinging at the hips like a deadlift. Both joints move at the same time. As you descend, keep your chest up, your knees tracking over your toes (not collapsing inward), and your weight distributed across your entire foot — heel, ball, and toes all in contact with the floor. Think about “spreading the floor” with your feet as you go down. This cue activates your glutes and keeps your knees in proper alignment.

    Depth

    Proper squat form requires reaching at least parallel — meaning the hip crease drops to the level of the top of your knee or below. This is the range of motion at which the glutes and hamstrings are maximally recruited. Quarter squats are not squats. If mobility is limiting your depth, I’ll cover that in detail below. But the goal is always hip crease at or below parallel.

    The Drive Up

    Out of the hole, think “chest up and knees out” simultaneously. Drive your feet through the floor, push your hips forward, and maintain that braced torso all the way to lockout. Your hips and shoulders should rise at the same rate — if your hips shoot up first, your chest falls forward and you’ve turned your squat into a good morning. Exhale at the top once you’ve locked out, reset your brace, and go again.

    Footwear plays a bigger role in squat execution than most people realize. I recommend the MANUEKLEAR Deadlift Shoe – Weight Lifting Shoes for Men Women as a versatile flat-soled option for lifters who want a stable, zero-drop platform under the bar. The barefoot-style sole keeps your foot in full contact with the floor, which improves proprioception and prevents the energy loss you get from training in soft-soled running shoes. I’ve had several clients switch to these and immediately notice better stability and a more grounded feel during their drive phase. They’re also cross-trainer friendly, so they pull double duty on days when you’re moving between squat racks and conditioning work.

    The Most Common Squat Mistakes

    Butt Wink

    Butt wink refers to posterior pelvic tilt at the bottom of the squat — the pelvis tucks under and the lower back rounds. A small amount is normal and not dangerous at light loads, but excessive rounding under heavy weight significantly increases lumbar disc stress. The most common cause is limited ankle or hip mobility preventing a full, neutral-spine descent. Don’t just squat shallower to avoid it — address the mobility restriction directly.

    Valgus Collapse (Knees Caving In)

    Knee cave — where the knees track inward on the descent or drive — is one of the most dangerous and most common errors in how to squat. It places massive rotational stress on the knee joint and is a leading cause of ACL and meniscus injuries over time. The fix is twofold: cue “knees out” aggressively on every rep, and strengthen your hip abductors and glute medius with accessory work like banded squats, clamshells, and lateral band walks.

    The Good Morning Squat

    This happens when your hips rise faster than your shoulders out of the hole, causing your torso to fall forward and the lift to convert into a hip hinge. It’s usually a sign of quad weakness relative to the posterior chain. The fix is paused squats, tempo squats, and front squats to force a more upright position and build quad-dominant strength patterns.

    Not Hitting Depth

    Partial range of motion squats reduce glute activation, limit muscle development, and teach your nervous system to stop short. If you’re not hitting at least parallel, you’re leaving the best results on the table. Record yourself from the side — most lifters who think they’re hitting depth are not.

    Excessive Forward Lean

    Some forward lean is natural and unavoidable, especially with a low bar setup. But if your torso is nearly horizontal, it’s typically caused by ankle mobility restrictions, weak upper back, or incorrect bar placement. Improving ankle dorsiflexion and reinforcing “chest up” as a setup cue will correct this in most cases.

    If knee discomfort is part of your squat story, compression sleeves can make a real difference in how your joints feel under load. Most of my intermediate and advanced clients train in the Gymreapers Knee Sleeves (1 Pair) with Gym Bag, and I keep a pair in my own gym bag. These are 7mm neoprene IPF-approved sleeves that provide genuine compression and warmth to the knee joint — not just a psychological crutch. The added proprioceptive feedback they provide helps many lifters maintain better tracking and knee alignment, particularly during heavy working sets. The included gym bag is a nice touch that keeps them from stinking up your kit.

    Can’t Squat Deep? Here’s Why

    Ankle Mobility Limitations

    Limited ankle dorsiflexion is the number one reason lifters can’t hit depth without their heels rising or their torso pitching forward. Test it by trying a deep squat barefoot — if your heels come up, your ankles are the problem. Fix it with daily ankle stretching (banded ankle mobilizations, wall ankle stretches), calf foam rolling, and in the short term, elevate your heels slightly with plates while you build mobility. Consistency over weeks is what moves the needle here, not one session of stretching.

    Hip Mobility

    Tight hip flexors and limited hip internal rotation can both restrict your ability to descend into a deep squat without butt wink or groin discomfort. The goblet squat hold at the bottom is one of my favorite corrective tools — use a light dumbbell or kettlebell, sink into a deep squat, use your elbows to push your knees out, and hold for 30–60 seconds. Add 90/90 hip stretches and pigeon pose into your daily warm-up routine to address capsular and soft tissue restrictions over time.

    When to Use Squat Shoes

    Weightlifting shoes with an elevated heel are one of the most effective tools for improving squat depth immediately. The raised heel effectively compensates for limited ankle dorsiflexion, allowing you to stay more upright and hit greater depth without any lower back rounding. They’re particularly valuable for high bar squats, Olympic lifting, and anyone with naturally limited ankle range of motion. I recommend the Adidas Unisex-Adult Powerlift 5 Weightlifting Shoe as a best-in-class option for most lifters. The Powerlift 5 features Adidas’s signature raised heel platform and a wide, flat sole that creates exceptional stability at the bottom of the squat. They’re what I personally lace up on squat days, and they’ve been a game-changer for clients who previously struggled to hit depth consistently.

    For lifters dealing with chronic knee discomfort or who want extra joint support during maximal efforts, knee wraps offer another layer of protection beyond sleeves. The DMoose Fitness Knee Sleeves for Weightlifting — which also come in a wrap configuration — are USPA and IPL approved and designed specifically for the compressive demands of squatting and powerlifting. What sets them apart is the 78-inch length that allows you to customize tightness and support based on your load and comfort level. I typically recommend these to lifters who are pushing near-maximal weights or coming back from a knee injury and need both stability and confidence under the bar.

    Final Thoughts on Squat Form

    Learning how to squat well is a process, not a one-time event. Even experienced lifters benefit from filming their sets, working with a coach, and regularly revisiting the fundamentals. Proper squat form is what separates lifters who make steady progress year over year from those who plateau and get hurt. Get your setup right, brace hard, hit depth, and address your mobility restrictions before piling more weight on the bar. The squat rewards patience and precision — put in the work on technique now, and the strength gains will follow.

  • How to Deadlift With Proper Form: The Complete Technique Guide

    How to Deadlift With Proper Form: The Complete Technique Guide

    This post contains affiliate links. As an Amazon Associate, I earn from qualifying purchases at no extra cost to you.

    If I could only teach one exercise for the rest of my coaching career, it would be the deadlift — no contest. No other movement builds raw strength through the posterior chain, improves posture, and transfers directly to real-world function quite like this one. Knowing how to deadlift properly is one of the most valuable physical skills you can develop. But here’s the catch: the deadlift is also one of the most frequently butchered exercises in any gym. Poor deadlift form doesn’t just limit your progress — it puts serious stress on your lumbar spine, knees, and hips in ways that can sideline you for months. This guide walks you through every detail of setup, execution, and common mistakes so you can pull heavy and pull safely for years to come.

    Deadlift Setup: Getting Into Position

    The setup is where most lifters lose the rep before it even begins. Get this right and the lift almost takes care of itself.

    Foot Position

    Stand with your feet roughly hip-width apart — that’s narrower than most people think. Your mid-foot should be directly under the bar, which means the bar is sitting about an inch from your shins when you look down. Do not walk up and press your shins into the bar before you’ve hinged. That error forces the bar forward before the lift even starts.

    Grip

    Reach down and grip the bar just outside your knees. A double overhand grip is my default recommendation for anyone under 80–85% of their max — it builds balanced grip strength. For heavier sets, a mixed grip (one hand over, one under) adds security. Hook grip is another option for advanced lifters willing to tolerate some thumb discomfort.

    Hip Hinge — Not a Squat

    This is the single most misunderstood element of deadlift form. To get into position, push your hips back — don’t sit down. Your hips should be higher than your knees, and your shoulders slightly in front of the bar. If your hips drop too low, you’ve turned the movement into a squat, which changes the mechanics entirely and shifts the bar away from your center of mass.

    Brace and Engage

    Before you pull, take a deep diaphragmatic breath and brace your core as if you’re about to take a punch. Engage your lats by thinking “protect your armpits” or “bend the bar around your legs.” This lat engagement is critical — it keeps the bar tight to your body and prevents rounding. Your spine should be neutral, not excessively arched or rounded.

    One thing that makes an enormous difference in your setup is your footwear. Thick, cushioned running shoes create an unstable base and actually increase the distance the bar has to travel. I recommend training in flat, minimal shoes whenever possible. The MANUEKLEAR Deadlift Shoes are specifically designed for exactly this purpose. They feature a barefoot-style, zero-drop sole that puts you directly in contact with the floor �� improving your proprioception, stability, and force transfer through the lift. Most of my in-person clients have made the switch after struggling with balance in their old runners, and the difference in their setup position is immediately noticeable. The forest green colorway also happens to look sharp, which is a bonus.

    If you prefer a slip-on option that’s just as effective, the relxfeet Men’s Minimalist Barefoot Shoes are another solid pick I keep recommending. They have a wide toe box that lets your foot spread naturally under load — important for maintaining a strong, stable base — along with a zero-drop sole and lightweight construction. This is what I keep in my gym bag on travel days when I’m training in unfamiliar gyms. They pack flat, they’re versatile enough for warming up and conditioning work, and they perform exactly as a lifting shoe should during heavy pulls.

    How to Deadlift: Step-by-Step Execution

    Now that you’re set up, here’s how to deadlift through the full range of motion with control and intention.

    The Pull

    Think “push the floor away” rather than “pull the bar up.” This mental cue activates your leg drive and keeps your hips from shooting up too fast. Before the bar leaves the ground, pull the slack out of the bar first — you’ll hear a subtle clunk as the plates settle and tension builds in the bar. Then initiate the drive. Rushing this step and jerking the bar creates a shock load on your spine that serves no one.

    Bar Path and Hip/Shoulder Rise

    The bar should stay in contact with your legs the entire way up. This is non-negotiable. The moment the bar drifts away from your body, your leverage gets worse and your lower back takes on disproportionate load. Your hips and shoulders should rise at exactly the same rate — the angle of your torso stays constant until the bar passes the knee. If your hips rise faster than your shoulders, you’ve essentially turned the deadlift into a stiff-leg RDL mid-rep, which is a recipe for strain.

    Lockout and Lowering

    At the top, stand tall and squeeze your glutes hard. Do not hyperextend your lower back in an attempt to “finish” the rep — that’s unnecessary spinal loading that adds zero strength benefit. Simply stand upright, hips through, glutes contracted. To lower the bar, reverse the movement: push your hips back first, keeping the bar close to your legs, then bend your knees once the bar passes them.

    For lifters working at heavier loads, a quality lifting belt is a legitimate performance and safety tool — not a crutch. A belt gives your core something to brace against, increasing intra-abdominal pressure and protecting your spine at near-maximal efforts. The Dark Iron Fitness Genuine Leather Weightlifting Belt is one I’ve used personally and recommended to dozens of clients. It’s four inches wide, constructed from genuine leather with reinforced stitching, and uses a double prong buckle that locks in securely without the fuss of a lever. The leather stiffness gives you excellent feedback — you can really feel yourself bracing into the belt — which actually teaches better bracing mechanics over time.

    Common Deadlift Form Mistakes

    • Rounding the lower back: This is the number-one injury risk in the deadlift. It typically happens because the weight is too heavy, the lats aren’t engaged, or the lifter doesn’t brace before pulling. Fix it by lightening the load and focusing on a neutral spine before the bar moves.
    • Squatting the deadlift: When the hips drop too low, the bar is forced forward and your quads take over a movement that should be hip-dominant. Keep your hips higher than your knees in the setup — this is a hinge, not a squat.
    • Bar drifting forward: If the bar is swinging away from your body during the pull, you’re losing mechanical advantage. Engage your lats harder and think about keeping the bar “dragging” up your shins and thighs.
    • Jerking the bar off the floor: Slack must be removed from the bar before you drive. Explosively yanking at the bar creates a sudden, uneven load spike that stresses your spine and often breaks your position immediately.
    • Hyperextending at the top: Leaning back aggressively at lockout is not a sign of strength — it’s a sign of poor motor control. Stand tall, not backward. Glutes contracted, ribs down.

    If you’re training at higher intensities where a belt becomes appropriate, another excellent option worth considering is the RDX Weight Lifting Belt. What sets this one apart is the choice between 4-inch and 6-inch padded options in genuine cowhide leather, plus 10 adjustable holes that give you a very precise fit — something that matters more than most people realize when you’re bracing hard under a heavy bar. I’ve found the extra padding particularly useful for clients who are newer to belt training and find the hard edge of a standard powerlifting belt uncomfortable during the learning curve. It’s a well-built belt at a fair price point for serious recreational lifters.

    Conventional vs Sumo Deadlift: Which Is Right for You?

    The conventional deadlift — feet hip-width, hands outside the knees — is the standard starting point and works well for most body types. The sumo deadlift uses a much wider stance with the hands gripping inside the legs, which shortens the range of motion and shifts more demand onto the hips and adductors while reducing lower back stress.

    Lifters with longer torsos and shorter femurs often do well with conventional. Lifters with longer femurs or limited hip mobility frequently find sumo more comfortable and biomechanically advantageous. Neither is universally superior — both build serious strength when performed with proper deadlift form. My recommendation: learn conventional first to build foundational hip hinge mechanics, then experiment with sumo to see which feels stronger and more natural for your structure. Many competitive powerlifters have found their best numbers only after trying both over several training cycles.

    How Much Should You Deadlift? (Strength Standards)

    Knowing where you stand relative to general strength standards is useful for setting realistic goals and programming appropriately. These are rough guidelines based on bodyweight multipliers for the conventional deadlift:

    • Beginner (less than 1 year of training): 1x bodyweight
    • Novice (1–2 years): 1.5x bodyweight
    • Intermediate (2–4 years): 2x bodyweight
    • Advanced (4+ years): 2.5x bodyweight
    • Elite: 3x+ bodyweight

    These numbers should inform your training, not define your worth as a lifter. Body proportions, training history, age, and genetics all play a role. What matters most is consistent progress over time with sound mechanics. A 1.5x bodyweight deadlift with perfect form is worth far more than a 2x bodyweight pull that destroys your lower back every session.

    Final Thoughts

    Understanding how to deadlift with precision is a skill that pays dividends across every area of your training and daily life. The setup, the brace, the hip hinge, the bar path — every detail compounds into a lift that’s either building you up or gradually breaking you down. Invest the time to nail proper deadlift form before chasing numbers, choose your equipment wisely, and approach progressive overload with patience. The deadlift rewards those who respect it. Start light, move well, and build from there — your future self will thank you.

  • The Big 4 Lifts: Why Squat, Deadlift, Bench, and Row Should Be Your Foundation

    The Big 4 Lifts: Why Squat, Deadlift, Bench, and Row Should Be Your Foundation

    When I was running track in high school, our coach had one answer for everything: “run more miles.” It took me years to realize how wrong that approach was — and even longer to see I was making the exact same mistake in the weight room, bouncing between a dozen isolation machines and wondering why my progress had completely stalled. If your program feels scattered, if you’re grinding away at cable flyes and leg extensions but not actually getting stronger, the fix isn’t more exercises — it’s the right ones. The squat, deadlift, bench press, and barbell row aren’t just movements; they’re the foundation of nearly every serious strength program ever written, and once you commit to building around them, the results have a way of speaking for themselves.

    This post contains affiliate links. As an Amazon Associate, I earn from qualifying purchases. This means if you click a link and make a purchase, I may earn a small commission at no extra cost to you. I only recommend gear I genuinely believe in.

    What Are the Big 4 Compound Lifts and Why Do They Matter?

    A compound lift is any movement that works multiple muscle groups and joints at the same time. Compare that to an isolation exercise like a bicep curl, which only targets one muscle. The big 4 compound lifts — squat, deadlift, bench press, and barbell row — recruit massive amounts of muscle tissue simultaneously, which means more strength, more muscle, and more calories burned per rep. Research consistently shows that multi-joint, compound movements produce superior hormonal responses (think testosterone and growth hormone) compared to isolation work. Simply put, they give you the most return on your investment of time and energy in the gym.

    Let me break down each lift so you know exactly what you’re working and why it belongs in your routine.

    The Squat: King of Lower Body Strength

    The barbell back squat works your quads, hamstrings, glutes, core, and even your upper back. It’s a full-body movement disguised as a leg exercise. Squatting heavy and consistently builds powerful legs and hips, improves athletic performance, and develops the kind of core stability that carries over to everything else in life — from carrying groceries to sprinting. Whether you go low-bar or high-bar, the squat is non-negotiable if you want to build a strong, athletic body.

    The Deadlift: Total-Body Power in One Pull

    The deadlift might be the single most effective exercise in existence. You’re pulling a loaded barbell from the floor using your hamstrings, glutes, lower back, traps, lats, forearms, and core — all at once. It builds raw, functional strength that transfers directly to real-world movements. It also has an incredible ability to pack on muscle across your entire posterior chain (the muscles running down the back of your body), which is an area most gym-goers dramatically neglect. One thing to note: proper setup and bracing technique is critical on the deadlift. Never rush it.

    The Bench Press: Upper Body Pushing Strength

    The bench press is the gold standard for upper body pushing strength. It trains your chest (pectorals), front shoulders (anterior deltoids), and triceps simultaneously. When programmed correctly with progressive overload — meaning you’re gradually adding weight or reps over time — the bench press builds a thick, powerful chest and strong pressing muscles that support shoulder health and athletic performance. Don’t skip leg drive and proper arch technique here; bench pressing is more of a full-body movement than most people realize.

    The Barbell Row: The Pull That Completes the Picture

    The barbell row is the most underrated of the big four, and that’s a shame. Rowing heavy builds your lats, rhomboids, rear deltoids, traps, and biceps — all the muscles responsible for pulling strength and healthy posture. It also directly balances out the bench press, which is essential for keeping your shoulders healthy long-term. If you bench press and don’t row, you’re building an imbalance that’s going to catch up with you. Add heavy rows and watch your bench press improve, your posture improve, and your back thickness explode.

    How to Build Your Program Around These Lifts

    You don’t need a complicated program. In fact, simplicity is your best friend when you’re building strength. Here’s a simple framework that works for beginners and intermediate lifters alike:

    • Train 3–4 days per week — Your body needs recovery time to get stronger. More is not always better.
    • Lead every session with one of the big 4 — Do your compound lift first, when you’re fresh and mentally sharp.
    • Work in the 3–5 sets of 3–8 rep range for strength and muscle, using progressive overload each week.
    • Add accessory work after — Isolation exercises like curls, tricep work, or leg curls are fine, but they’re the side dish, not the main course.
    • Track your lifts — You can’t manage what you don’t measure. Keep a training log and aim to add a little weight or an extra rep each session.

    Pair squats with rows on one day, and deadlifts with bench press on another. This way your pushing and pulling muscles get balanced attention and you’re not overloading the same muscle groups back-to-back.

    Gear I Recommend for the Big 4 Lifts

    You don’t need a ton of equipment to get strong, but a few quality pieces of gear will make a meaningful difference in your performance and safety — especially as the weights get heavier. Here’s what I personally recommend:

    Lifting Belts for Squats and Deadlifts

    A good lifting belt is one of the best investments you can make once you’re moving serious weight. It doesn’t do the work for you — instead, it gives your core something to brace against, which increases intra-abdominal pressure and protects your spine under heavy loads. I recommend two options depending on your preference:

    The Beast Power Gear Lever Buckle Lifting Belt (10MM) is a fantastic choice for lifters who want a quick-release lever buckle with a thick, supportive build. The lever system means you can get a consistent, tight fit every single set without fumbling with a prong. They also offer a 13MM version for those who want maximum rigidity during heavy powerlifting-style work. If you’re pulling and squatting heavy, this level of support is worth it.

    Another excellent option is the IBRO Powerlifting Lever Gym Belt — a 10MM genuine leather belt built to IPF (International Powerlifting Federation