If I had to pick one exercise that every lifter — beginner or advanced — needs to master, it’s the squat. It builds more total muscle mass, demands more full-body coordination, and transfers to more real-world movement patterns than almost anything else you can do under a barbell. But here’s the catch: the squat is also the most technique-dependent lift in the gym. Done well, it’s transformative. Done poorly, it’s a fast track to knee pain, lower back strain, and wasted training. That’s why learning how to squat correctly from the start isn’t optional — it’s the whole game. In this guide, I’m going to walk you through every element of squat form so you can train heavier, move better, and stay injury-free for the long haul.
Squat Setup: Bar Position, Stance, and Grip
Before you touch the bar, you need a plan. The decisions you make during setup determine everything that happens on the way down and back up.
High Bar vs. Low Bar
High bar positioning places the barbell across the upper traps, just below the base of the neck. It produces a more upright torso and is the go-to for Olympic lifters, athletes, and most general fitness trainees. Low bar positioning sits the bar two to three inches lower, across the rear deltoids, which shifts the torso forward and allows more weight to be moved — making it the preferred setup for most powerlifters. Neither is universally superior. If you’re training for athletic performance or body composition, start with high bar. If your primary goal is maximal strength and competition, low bar is worth learning.
Stance Width and Foot Angle
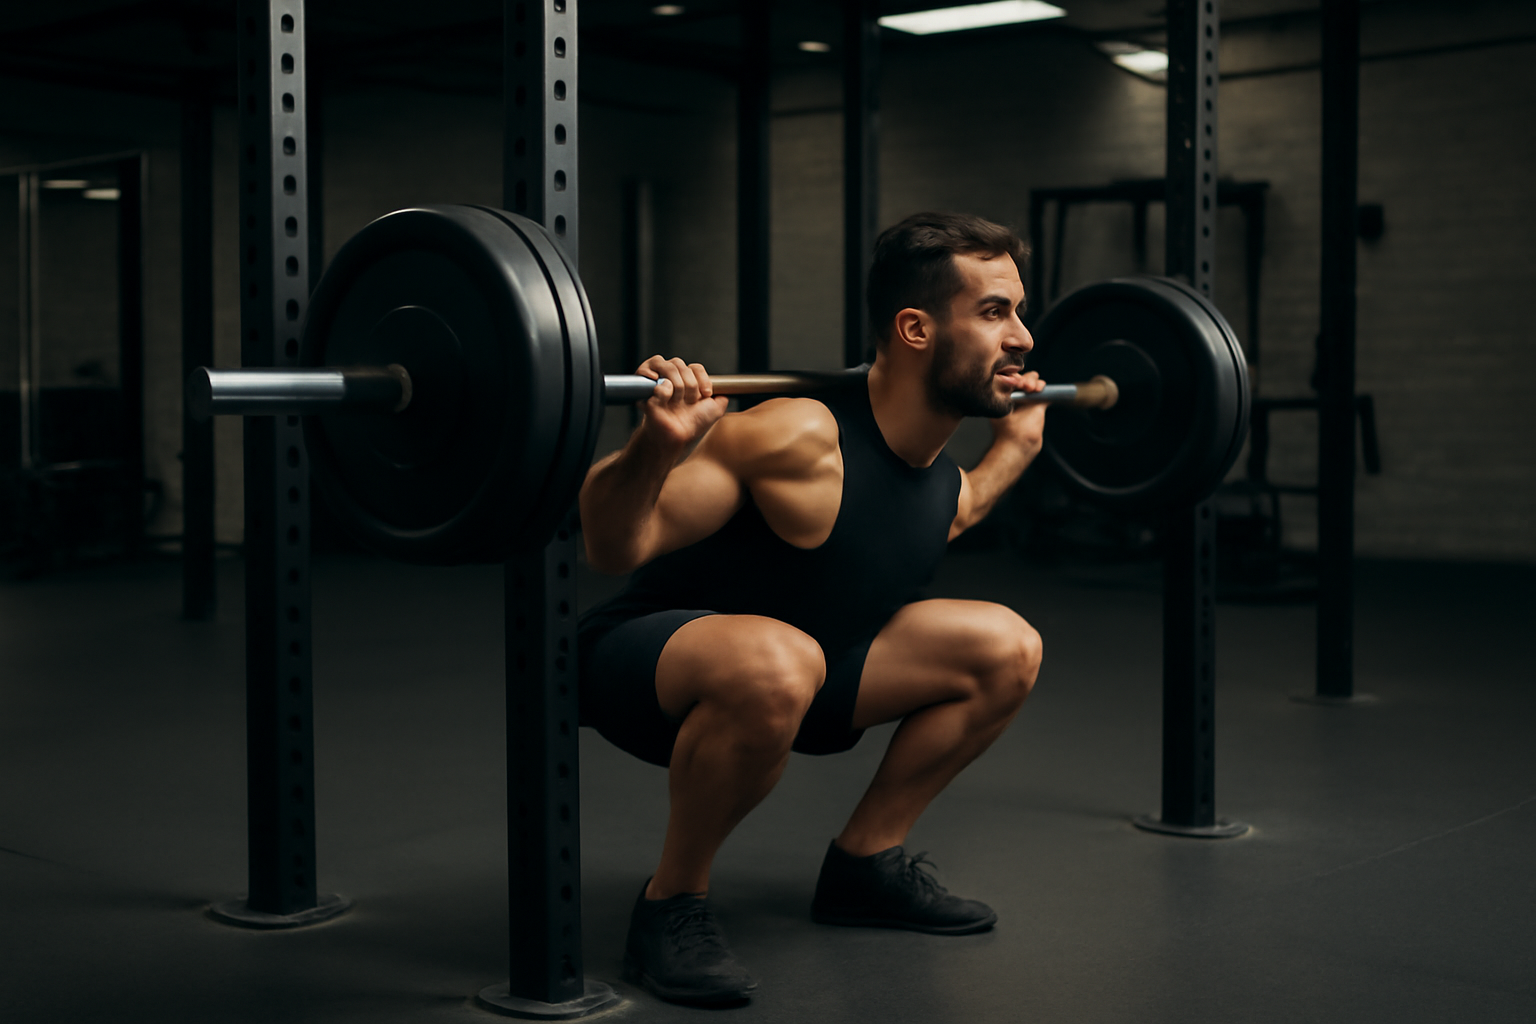
Stance width is not one-size-fits-all — it’s anatomy-dependent. A shoulder-width stance works well for most people, but lifters with wider hips or deeper hip sockets often squat better with a slightly wider stance. Experiment within a range of shoulder-width to just outside shoulder-width. As for foot angle, point your toes out somewhere between 15 and 30 degrees. This toe-out position matches the natural angle of your femurs and allows your knees to track directly over your toes throughout the movement. Forcing your feet straight forward is a common mistake that restricts depth and puts unnecessary stress on the knee joint.
Grip and Wrist Position
Your grip width should be just wide enough to allow your elbows to drive down and back without shoulder discomfort. A thumbless or “suicide” grip is common among experienced lifters, but a full grip works perfectly fine. The critical point is wrist position: do not let your wrists bend back under the bar. Keep them neutral and straight. Bent wrists under load lead to forearm and elbow pain over time. If achieving this position is difficult, widen your grip slightly and work on shoulder and thoracic mobility.
How to Squat: Step-by-Step Execution
The Walkout
Unrack the bar by taking it out in no more than two to three steps. Step back with one foot, bring the other foot to your squat stance, and make one final micro-adjustment if needed. That’s it. Every extra step you take is wasted energy and an opportunity to lose your setup. Once you’re in position, don’t drift forward or shuffle around — own your stance before you descend.
Bracing
Before every single rep, take a deep diaphragmatic breath — breathe into your belly, not your chest — and brace your entire core as hard as you can, as if you’re about to take a punch to the stomach. This intra-abdominal pressure creates a rigid column of support for your spine. Don’t just breathe in; brace outward in all directions. This is the Valsalva maneuver, and it is non-negotiable for safe, strong squatting under load.
The Descent
Initiate the squat by breaking at the hips and knees simultaneously — not by pushing the knees forward first, and not by hinging at the hips like a deadlift. Both joints move at the same time. As you descend, keep your chest up, your knees tracking over your toes (not collapsing inward), and your weight distributed across your entire foot — heel, ball, and toes all in contact with the floor. Think about “spreading the floor” with your feet as you go down. This cue activates your glutes and keeps your knees in proper alignment.
Depth
Proper squat form requires reaching at least parallel — meaning the hip crease drops to the level of the top of your knee or below. This is the range of motion at which the glutes and hamstrings are maximally recruited. Quarter squats are not squats. If mobility is limiting your depth, I’ll cover that in detail below. But the goal is always hip crease at or below parallel.
The Shoe That Finally Locked My Feet Into Position
A lot of lifters underestimate how much foot stability matters in the squat. I spent months coaching clients who had solid technique everywhere else — hips, back, core — but were still losing position in their feet, which cascaded into knee valgus and ankle instability. That’s when I realized a proper lifting shoe with a rigid sole and elevated heel isn’t a luxury; it’s a tool that lets your technique actually express itself.
What works
- The rigid sole stops your foot from rolling or collapsing mid-rep — you can feel the difference immediately when you’re driving out of the hole and it actually matters when you’re loading heavy.
- The heel elevation naturally shifts your tibia angle forward, making it way easier to hit depth without compensation in your lower back or knees rounding inward.
- The lateral support across the midfoot keeps your weight centered over mid-foot even when you’re fighting to stay upright under a heavy load — no more feeling like you’re balancing on a tightrope.
What doesn’t
- They’re noticeably stiffer than regular trainers, which can feel awkward in your first session — your ankle and calf have to work harder to accommodate the elevated heel and locked-down feel.
- The break-in period is real; I had minor heel rub on my first heavy session and questioned whether I’d picked the right size, even though they sorted out after three or four workouts.
I almost returned mine after that first session because I wasn’t used to the rigid platform and thought I’d made a mistake, but by week two I was hitting depth with zero ankle wobble and my knees tracked perfectly. If you’re serious about squat technique, grab the MANUEKLEAR Deadlift Shoe – Weight Lifting Shoes for Men Women.
This post contains affiliate links. As an Amazon Associate, I earn from qualifying purchases at no extra cost to you.

Written by Jordan Ellis
Jordan Ellis is a personal trainer with over eight years of experience helping everyday people get stronger and move better. He focuses on home fitness: effective training spaces, equipment that earns its price, and programs that work in a spare room or basement, not just a commercial gym.