Runner’s knee is the most common running injury—accounting for about 25% of all running-related pain—and yet the standard advice you’ll find online hasn’t changed much in twenty years. Rest. Ice. Compression. Elevation. Then quad strengthening. Maybe add a knee strap for good measure.
The problem? That advice isn’t wrong, but it’s incomplete. And incomplete rehab is why so many runners spend months managing their knee pain instead of fixing it.
The actual research tells a different story. Studies show that hip strength—particularly in the glute medius—is as important or more important than quad strengthening for resolving patellofemoral pain syndrome (PFPS). Yet this rarely shows up in Google’s top results or in the advice most runners get from generic fitness sources.
This post is the protocol I use with runners who want to fix their knee pain in six weeks, not manage it indefinitely.
| Approach | Effectiveness | Why It Falls Short |
|---|---|---|
| Quad strengthening alone | Addresses part of the problem | Doesn’t fix hip weakness causing dynamic valgus |
| Hip strengthening | As effective or more effective than quad work | Addresses root cause of patellofemoral pain |
| Knee strap or brace | Temporary pain reduction | Creates dependency; doesn’t build internal stability |
| Foam rolling the IT band | No meaningful lengthening of tendon | Doesn’t address underlying muscle weakness |
| Complete rest | Feels intuitive | Causes deconditioning and accelerates problem |
What Runner’s Knee Actually Is
First, let’s be clear about the diagnosis. Runner’s knee—clinically called patellofemoral pain syndrome—manifests as pain around or behind the kneecap. It typically worsens when:
- Running, especially downhill
- Climbing or descending stairs
- Squatting or lunging
- Sitting with the knee bent for prolonged periods (what I call the “movie theater sign”)
Here’s the critical distinction: In most cases, runner’s knee is not a structural problem. Your MRI will likely be normal. Your knee joint cartilage is fine. Your ligaments are intact. You don’t have a “bad knee.”
What you have is a load management and muscle imbalance problem. Your knee is receiving abnormal stress because of how your body is moving during running and daily activities. The pain is real—very real—but the fix doesn’t require surgery, weeks of rest, or a fancy brace.
It requires understanding where the real problem lives: your hips.
The Hip Connection Most Runners Miss
When your hip abductors—specifically the glute medius—are weak, something biomechanically catastrophic happens during running: your knee caves inward. This is called dynamic valgus, and it’s the primary driver of patellofemoral pain in most runners.
Think of your glute medius as the muscle responsible for stabilizing your pelvis when you’re standing on one leg. When it’s weak, your pelvis tilts, and your femur (thighbone) internally rotates. This changes the angle at which your kneecap tracks in its groove—the patellofemoral groove. Suddenly, your kneecap is being pulled laterally (outward) with every stride, creating friction and pain.
The research backs this up. Lack et al. (2015) published a meta-analysis in the British Journal of Sports Medicine comparing hip strengthening versus quad strengthening for PFPS. Hip strengthening was as effective or more effective than isolated quadriceps work. Yet the quad-focused approach remains the default recommendation for most runners.
This isn’t to say quads don’t matter—they absolutely do. But if you’re doing quad strengthening without addressing hip weakness, you’re putting a band-aid on a deeper issue.
Self-Assessment: The Single-Leg Squat Test
Before starting the protocol, you need to know if you actually have a hip strength deficit. Here’s how to check:
The Single-Leg Squat Test:
- Stand in front of a mirror or, better yet, have someone film you from the front with your phone
- Stand on one leg and slowly lower into a squat, keeping your trunk upright
- Lower to about 45 degrees (roughly a quarter-squat depth)
- Watch your knee carefully
What you’re looking for: Does your knee dive inward toward your midline? Even slightly?
If yes, you have a hip strength deficit. That inward collapse of the knee during a single-leg movement is dynamic valgus, and it’s your smoking gun. This is what happens to your knee with every running stride if your glute medius isn’t strong enough to stabilize your pelvis.
What Doesn’t Work (And Why You Can Skip It)
Before we dive into what does work, let’s address the things people waste time on:
Knee Straps and Braces: The knee brace and strap industry is built on a appealing promise: external support to stabilize the knee. The evidence? There’s no consistent data showing long-term benefit. Some studies show modest short-term pain reduction, but this doesn’t translate to healing or lasting recovery. A strap might make your knee feel better for a run, but it’s not fixing the underlying weakness. It’s also creating a dependency—your body learns to rely on external support instead of building internal stability. Skip the expensive brace.
Foam Rolling the IT Band: This one frustrates me because it’s so pervasive. Your iliotibial (IT) band is a tendon. Tendons don’t lengthen meaningfully from self-myofascial release. You cannot roll away the IT band’s tightness. What you can do is build strength in the muscles that attach to it. That’s what this protocol does.
Complete Rest: This is counterintuitive but critical: complete rest makes runner’s knee worse, not better. Why? Because deconditioning accelerates the problem. Your muscles atrophy. Your body loses the movement patterns it needs. You come back from rest weaker than when you started. The answer isn’t rest—it’s intelligent load management.
The 6-Week Protocol
Weeks 1-2: Reduce Load, Start Strengthening
Running Volume: Cut your running volume by 50%. If you normally run 20 miles a week, drop to 10. If you run 5 days a week, drop to 2-3 days. This isn’t about giving up running—it’s about giving your knee time to adapt while you rebuild the muscles that stabilize it. You’ll return to full volume by week 5.
Daily Hip Strengthening Routine (Do This Every Day):
1. Clamshells — 3 sets of 15 reps per side
Lie on your side with hips and knees bent to about 45 degrees. Keep your feet together and open your top knee upward, like opening a clamshell. You should feel this in the outer glute of your top leg. Control the movement both up and down. Don’t let your back rotate backward.
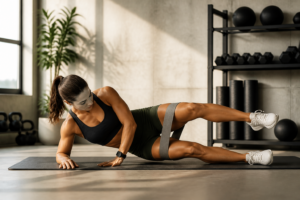
2. Side-Lying Hip Abduction — 3 sets of 15 reps per side
Lie on your side with your legs straight. Keep your top leg straight and lift it to about 45 degrees. This is different from the clamshell—your leg stays extended. The motion is pure hip abduction. Keep your trunk stable and don’t rotate backward.
3. Single-Leg Glute Bridge — 3 sets of 12 reps per leg
Lie on your back with one foot flat on the ground, knee bent to 90 degrees. The other leg is extended straight out. Press through your heel and lift your hips off the ground until your body forms a straight line from knee to shoulder. Squeeze the glute of the working leg at the top. Control the descent. This builds both strength and hip stability.
Isometric Quad Holds:
Wall Sit (Pain-Free Range Only) — 4 sets of 30 seconds
Lean your back against a wall and slide down to about 60 degrees of knee flexion (not a deep squat—this is important). You should not feel pain in the knee. If you do, reduce the depth. Hold for 30 seconds, rest 60 seconds, repeat 4 times. This builds quad endurance without aggravating the patellofemoral joint.
Frequency: Do this routine daily for 14 days. It takes about 12 minutes. This is non-negotiable if you want to fix your knee.
Weeks 3-4: Progressive Strengthening and Running Volume Return
Running Volume: Increase running volume by 10% per week. If you’re at 10 miles, go to 11 miles in week 3 and 12 miles in week 4. Keep it to pain-free running only. If a run hurts, back off the next day.
Continue All Week 1-2 Exercises: Clamshells, side-lying abduction, single-leg glute bridge, and wall sits. Maintain daily frequency.
Add These Exercises (3x per week on non-consecutive days):
1. Bulgarian Split Squats — 3 sets of 10 reps per leg
Stand facing away from a bench or couch. Place your back foot elevated on it. Lower your body by bending your front knee until it reaches about 90 degrees. Your back knee should nearly touch the ground. The front knee should stay over the ankle—don’t let it cave inward. Drive through the front foot to return to standing. This builds single-leg strength and forces you to stabilize the hip of the working leg.
2. Lateral Band Walks — 3 sets of 15 reps per direction
Loop a resistance band around your legs just above the knees. Stand with feet hip-width apart and a slight bend in your knees. Keeping tension on the band, step sideways, maintaining the knee bend. Take 15 steps in one direction, then 15 back. The band should stay taut throughout. This directly targets the glute medius in the position it works during running.
3. Step-Downs — 3 sets of 10 reps per leg
Stand on a box or step about 12 inches high. Stand on one leg. Slowly lower your body by bending the knee of the leg on the box, letting your other heel gently tap the ground below. The key here is control—the descent should take 2-3 seconds. Drive back to standing. Watch your knee in a mirror—if it dives inward, reduce the height of the step. This builds eccentric strength in the hip and quad in a running-specific position.
Single-Leg Balance Work: 3x per week, hold a single-leg stance for 30 seconds, 3 sets per leg. Stand on a firm surface. If this is too easy, stand on a pillow or unstable surface. This builds proprioception and hip stability without high load.
Weeks 5-6: Sport-Specific Training and Return to Full Volume
Running Volume: Return to your full pre-injury running volume by the end of week 5. Continue to avoid sudden spikes in volume or intensity. Run pain-free only.
Continue Hip Strengthening 3x per Week: Maintain lateral band walks, Bulgarian split squats, and step-downs. Your hip muscles need maintenance, not just initial development.
Add These Sport-Specific Exercises (3x per week):
1. Single-Leg RDL (Romanian Deadlift) — 3 sets of 10 reps per leg
Stand on one leg. Hinge forward at the hips while extending your free leg straight back for balance. Keep your lower back neutral and feel a stretch in the hamstring and glute of the standing leg. This mimics the single-leg stance phase of running and builds hip stability and posterior chain strength.
2. Lateral Lunges — 3 sets of 10 reps per side
Stand with feet together. Step laterally to one side and lower your body by bending that knee while keeping the other leg straight. Push off to return to center. This builds hip strength in the frontal plane—the same plane your knee is collapsing in during running.
3. Low Box Jumps (Impact Tolerance) — 3 sets of 8 reps
Jump onto a low box (8-12 inches). Land softly with both feet. Step down (don’t jump down). The goal here is to teach your body to absorb impact with proper hip stability. Low height, controlled landing. If your knees cave inward on landing, reduce the height or stop the exercise.
Running Form Adjustments
While you’re strengthening, make these small adjustments to your running form:
Increase Cadence by 5-10%: Cadence is your step rate—typically measured in steps per minute. Higher cadence reduces impact forces on the knee. Use a metronome app or watch your foot strike. Most runners naturally run around 170-180 steps per minute; try aiming for 180-190.
Shorten Your Stride Slightly: This naturally follows from higher cadence. Overstriding—reaching your foot far ahead of your body—increases impact forces and increases the demand on your hip stabilizers. Run shorter, faster steps.
Avoid Overstriding: Your foot should land roughly underneath your hips, not far in front of them. Film yourself from the side to check this. Overstriding is one of the most common form errors in runners with knee pain.
Return-to-Running Criteria
Don’t rush back to normal training volume. You need to pass these criteria:
- Pain-free daily activities for 1 full week: No pain walking, climbing stairs, or sitting. This is the baseline.
- Single-leg squat without knee collapse: Film yourself again and compare to your initial test. Your knee should track over your toes, not cave inward.
- 30 minutes of walking without pain: You should be able to walk for half an hour without any knee pain or swelling.
Once you pass these criteria, you can return to full running. But this doesn’t mean you’re done strengthening. Those hip exercises? You need to do them 2-3 times per week indefinitely. This isn’t a temporary rehab program—it’s maintenance for your body.
When to Seek Imaging
Most runner’s knee resolves with this protocol. But if you’ve been consistent for 8 weeks and pain persists, or if you develop swelling, locking, or a sense of the knee giving way, it’s time to see a sports medicine doctor or physical therapist. These symptoms might indicate cartilage damage, meniscal injury, or another structural problem that requires imaging and different treatment.
The Bottom Line
Runner’s knee isn’t something you have to manage indefinitely. It’s something you fix by addressing the real problem: weak hip abductors and poor movement patterns. This protocol works because it’s based on the actual research about what makes runner’s knee improve.
No expensive braces. No weeks of complete rest. Just smart strength training, intelligent load management, and patience for six weeks.
Do the work, and your knees will thank you.
The Tool That Lets You Train Through Phase Two
Once you’re past acute pain and moving into the loaded strengthening phases of this protocol—particularly when you’re doing the glute and hip work that actually fixes runner’s knee—a quality knee strap reduces compensatory stress on the patella. I have people use this during weeks 2–4 when we’re ramping up single-leg work and lateral movements; it’s a confidence tool that lets them focus on proper form instead of guarding the knee.
When your glute medius is weak, your knee caves inward during running—called dynamic valgus—which pulls your kneecap laterally and creates friction. Research by Lack et al. (2015) shows hip strengthening is as effective or more effective than isolated quad work for patellofemoral pain syndrome. Both matter, but addressing hip weakness is critical. Do the single-leg squat test: stand on one leg and lower to about 45 degrees while watching your knee in a mirror. If your knee dives inward toward your midline, you have dynamic valgus and a hip strength deficit. This inward collapse is what happens with every running stride when your glute medius is weak. A knee strap may reduce pain temporarily and improve confidence during loaded rehab work in weeks 2–4, but it doesn’t heal the underlying weakness. External support creates dependency—your body learns to rely on it instead of building internal stability. It’s a tool for form focus during training, not a replacement for strengthening. Cut your running volume by 50%. If you normally run 20 miles weekly, drop to 10. If you run 5 days a week, drop to 2–3 days. This intelligent load management gives your knee time to adapt while you rebuild stabilizing muscles. You’ll return to full volume by week 5.Frequently Asked Questions
Why is hip strength more important than quad strength for runner’s knee?
How do I know if I have a hip strength deficit?
Can I use a knee strap instead of fixing the underlying problem?
How much should I run during the first two weeks of the protocol?
About This Article

Written by Jordan Ellis. Jordan Ellis isn't a certified personal trainer — just someone who's been genuinely obsessed with training for over eight years and turned it into building smarter home gyms. He focuses on home fitness: effective training spaces, equipment that earns its price, and programs that work in a spare room or basement, not just a commercial gym. More about this site.
Scope and limits. Jordan is not a certified personal trainer, and nothing here is medical advice. Check with a physician before starting a new program, and prioritize form over load on every lift described.
Verify this against a primary source
Specifics change, and your situation may differ from the one described here. These are the authorities worth checking directly:
- Physical Activity Guidelines for Americans (HHS) — the federal physical activity guidelines
- American College of Sports Medicine — exercise prescription and position stands
- NSCA — strength and conditioning research